个人站功能点设计
本功能需求:
-左侧使用inclusion_tag对标签和分类进行过滤
-展示个人站点中的文章
拓展需求:
-对标签和分类进行的增删改操作
-创建个人站点
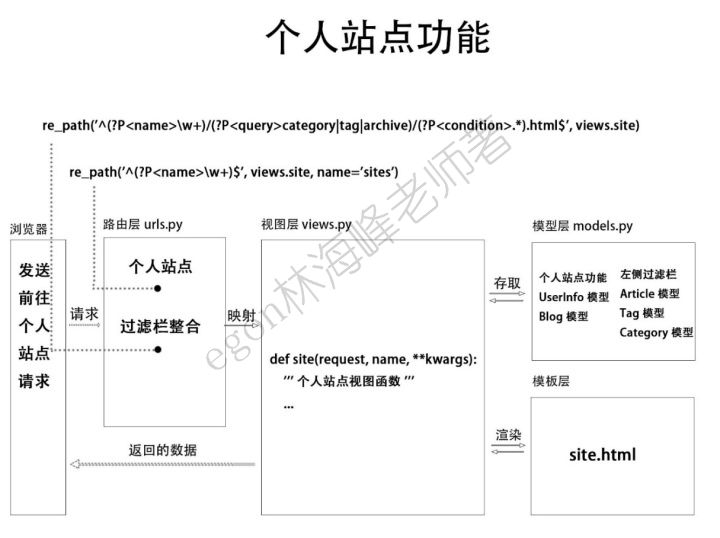
一、添加路由
个人站点路由urls.py (此路由一定要放在最后)
re_path('^(?P<name>\w+)$', views.site, name='sites')此外,我们可以将最左侧的3项过滤栏的路由整合到一起(使用有名分组的形式)
路由整合 urls.py
re_path('^(?P<name>\w+)/(?P<query>category|tag|archive)/(?P<condition>.*).html$', views.site)二、添加视图函数
在后端views.py中添加个人主页跳转的视图函数
def site(request, name, **kwargs):
    user = models.UserInfo.objects.filter(username=name).first()
    if user:
        try:
            article_list = user.blog.article_set.all()
            query = kwargs.get('query', None)
            if query == 'category':
                condition = kwargs.get('condition')
                article_list = article_list.filter(category_id=condition)
            elif query == 'tag':
                condition = kwargs.get('condition')
                article_list = article_list.filter(tag__id=condition)
            elif query == 'archive':
                condition = kwargs.get('condition')
                year, month = condition.split('/')
                article_list = article_list.filter(create_time__year=year, create_time__month=month)
            return render(request, 'site.html', locals())
        except:
            return render(request, 'other/Error.html')
    else:
        return render(request, 'other/Error.html')
三、个人站点功能涉及的模型层操作
个人站点页面的路由需要涉及用户表UserInfo以及对应的博客表Blog,从中获取用户信息以及博客信息进行跳转
个人站点左侧的inclusion_tag过滤栏是对文章进行标签,分类和创建时间的过滤,所以要操作数据库中的文章表Article(其中的创建时间字段)以及标签表(Tag)和分类表(Category)
四、个人站点功能前端模板
1、个人站点页面设计(详情页)
templates中的site.html(在此页面中继承了上面所写的base.html)
{% extends 'template_base/base.html' %}

{% block title %}
    {{ user.blog.title }}的个人站点
{% endblock %}

{% block content %}
    <div class="row">
        <div class="col-md-2">
            {% load sideBar %}
            {% left name %}
        </div>
        <div class="col-md-8">
            <nav aria-label="breadcrumb">
                <ol class="breadcrumb">
                    当前位置:
                    <li class="breadcrumb-item"><a href="/index/">首页</a></li>
                    <li class="breadcrumb-item active" aria-current="page">{{ user.blog.title }}的个人站点</li>
                </ol>
            </nav>
            <div class="alert alert-info"><strong>公告:</strong>{{ user.blog.subtitle }}</div>
            {% for article in article_list %}
                <div class="m-4 p-1 shadow-sm site-title-head bg-white-95">
                    <div class="media">
                        <a href="/{{ user.username }}/article/{{ article.id }}.html">
                            <img src="/media/{{ article.head_img }}" class="width-b100" style="border-radius: 6px">
                        </a>
                    </div>
                    <div class="mt-2 mx-3 mb-1 color-black-half">
                        <a href="/{{ user.username }}/article/{{ article.id }}.html" class="font-24">
                            {{ article.title }}
                        </a>
                        <hr class="mt-2 mb-2">
                        <span class="mx-2">
                            <i class="fa fa-user-o text-danger"></i> {{ user.username }}
                        </span>
                        <span class="mx-2">
                            <i class="fa fa-clock-o text-info"></i> {{ article.create_time|date:'Y年m月d日' }}
                        </span>
                        <span class="mx-2 width-80">
                            <i class="fa fa-thumbs-o-up text-success"></i> {{ article.up_num }}人点赞
                        </span>
                        <span class="ml-2 width-80">
                            <i class="fa fa-commenting-o text-warning"></i> {{ article.comment_num }}条评论
                        </span>
                    </div>
                </div>
            {% empty %}
                <div class="alert alert-warning alert-dismissible fade show" role="alert">
                    <strong>提示:</strong>暂无文章
                    <button type="button" class="close" data-dismiss="alert" aria-label="Close">
                        <span aria-hidden="true">×</span>
                    </button>
                </div>
                <div class="text-center">
                    <img src="/media/emotion/call.png" width="600" class="mt-3">
                    <h1 class="ml-4" style="font-size: 60px">快去催博主写文章啦!</h1>
                </div>
            {% endfor %}
        </div>
        <div class="col-md-2 text-center">
            <img src="/media/{{ user.avatar }}" width="100%" style="border-radius: 10px">
            <div class="text-left mt-2" style="line-height: 30px">
                <strong>昵称:</strong>{{ user.blog.title }}<br>
                <strong>性别:</strong>{% if user.gender == 1 %}男
            {% elif user.gender == 2 %}女
            {% else %}保密
            {% endif %}
                <br>
                <strong>电话:</strong>{{ user.phone }}<br>
                <strong>地址:</strong>{{ user.province }} {{ userinfo.city }}<br>
                <strong>邮箱:</strong>{{ user.email }}<br>
                <strong>园龄:</strong>{{ user.date_joined|timesince }}<br>
                <strong>注册日期:</strong>{{ user.date_joined|date:'Y年m月d日' }}<br>
                <strong>最后登录:</strong>{{ user.last_login|date:'m月d日H:i' }}<br>
            </div>
        </div>

    </div>
{% endblock %}

{% block js %}
    <script>
        $('body').attr('style', 'background:url(/media/{{ user.bg_img }}) !important;background-attachment: fixed !important;background-size: cover !important;')
    </script>
{% endblock %}