前言:
若没有C基础,可以简单理解namespace技术做到让不同容器在UTS、IPC、PID、Mount、Network、User六种资源的隔离即可,待对容器有深入理解之后,再回头看下述实现会有一个更深的认识。
一 Linux namespace 介绍
如果把linux操作系统比作一个大房子,那命名空间指的就是这个房子中的一个个房间,住在每个房间里的人都自以为独享了整个房子的资源,但其实大家仅仅只是在共享的基础之上互相隔离,共享指的是全局资源是共享的比如cpu、内存、磁盘等,而隔离指的是局部上彼此保持隔离比如容器内的pid、用户名等
因而命名空间的本质就是指:一种在空间上隔离的概念,当下盛行的许多容器虚拟化技术(典型代表如LXC、Docker)就是基于linux命名空间的概念而来的。
Linux 内核2.4.19中开始陆续引用了namespace概念。目的是将某个特定的全局系统资源(global system resource)通过抽象方法使得namespace中的进程看起来拥有它们自己的隔离的全局系统资源实例。
命名空间是Linux内核强大的特性。每个容器都有自己的命名空间,运行在其中的应用都是在独立操作系统中运行一样。命名空间保证了容器之间彼此互不影响
Linux Namespace是Linux提供的一种内核级别环境隔离的方法,关于隔离的概念其实大家早已接触过:比如在光盘修复模式下,可以用chroot切换到其他的文件系统,chroot提供了一种简单的隔离模式:chroot内部的文件系统无法访问外部的内容。Linux Namespace在此基础上又提供了很多其他隔离机制。
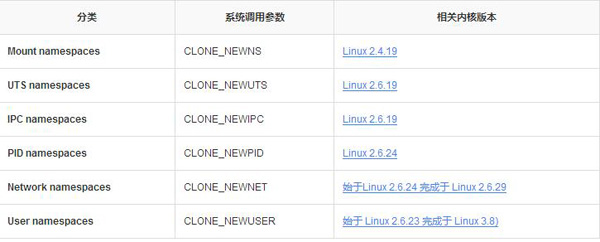
当前,Linux 支持6种不同类型的命名空间。它们的出现,使用户创建的进程能够与系统分离得更加彻底,从而不需要使用更多的底层虚拟化技术。详细请点击
二 Linux Namespaces深入分析
主要是三个系统调用
- clone() – 实现线程的系统调用,用来创建一个新的进程,并可以通过设计上述参数达到隔离。
- unshare() – 使某进程脱离某个namespace
- setns() – 把某进程加入到某个namespace
首先,我们来看一下一个最简单的clone()系统调用的示例,(后面,我们的程序都会基于这个程序做修改):
文件名:clone.c
#define _GNU_SOURCE
#include <sys/types.h>
#include <sys/wait.h>
#include <stdio.h>
#include <sched.h>
#include <signal.h>
#include <unistd.h>

/* 定义一个给 clone 用的栈,栈大小1M */
#define STACK_SIZE (1024 * 1024)
static char container_stack[STACK_SIZE];

char* const container_args[] = {
    "/bin/bash",
    NULL
};

int container_main(void* arg)
{
    printf("Container - inside the container!\n");
    /* 直接执行一个shell,以便我们观察这个进程空间里的资源是否被隔离了 */
    execv(container_args[0], container_args);
    printf("Something's wrong!\n");
    return 1;
}

int main()
{
    printf("Parent - start a container!\n");
    /* 调用clone函数,其中传出一个函数,还有一个栈空间的(为什么传尾指针,因为栈是反着的) */
    int container_pid = clone(container_main, container_stack+STACK_SIZE, SIGCHLD, NULL);
    /* 等待子进程结束 */
    waitpid(container_pid, NULL, 0);
    printf("Parent - container stopped!\n");
    return 0;
}
测试开辟一个新的名称空间:
[root@www ~]# gcc -o clone clone.c #编译clone.c
[root@www ~]# ./clone #执行编译的结果
Parent - start a container!
Container - inside the container!
[root@www ~]#         #进入了一隔离的空间
[root@www ~]# exit    #退出该空间
exit
Parent - container stopped!
[root@www ~]#         #又回到最初的空间
从上面的程序,我们可以看到,这和pthread基本上是一样的玩法。但是,对于上面的程序,父子进程的进程空间是没有什么差别的,父进程能访问到的子进程也能。
下面, 让我们来看几个例子看看,Linux的Namespace是什么样的。
因为下述测试涉及到用户权限问题,因此我们新建用户egon,并且赋予该用户sudo权限
执行visudo然后新增如下内容:
egon    ALL=(ALL)     NOPASSWD:ALL
2.1 UTS命名空间(系统调用CLONE_NEWUTS)
主要目的是独立出主机名和网络信息服务(NIS)。
文件名:uts.c
#define _GNU_SOURCE
#include <sys/types.h>
#include <sys/wait.h>
#include <stdio.h>
#include <sched.h>
#include <signal.h>
#include <unistd.h>

/* 定义一个给 clone 用的栈,栈大小1M */
#define STACK_SIZE (1024 * 1024)
static char container_stack[STACK_SIZE];

char* const container_args[] = {
    "/bin/bash",
    NULL
};

/* 与uts有关的代码:此处只演示主机名的隔离 */
int container_main(void* arg)
{
    printf("Container - inside the container!\n");
    sethostname("container",10); /* 设置hostname */
    execv(container_args[0], container_args);
    printf("Something's wrong!\n");
    return 1;
}

int main()
{
    printf("Parent - start a container!\n");
    int container_pid = clone(container_main, container_stack+STACK_SIZE,
            CLONE_NEWUTS | SIGCHLD, NULL); /*启用CLONE_NEWUTS Namespace隔离 */
    waitpid(container_pid, NULL, 0);
    printf("Parent - container stopped!\n");
    return 0;
}
测试开辟一个新的UTS名称空间/容器container,验证主机名的隔离性:
[egon@www ~]$ gcc -o uts uts.c #编译utc.c得到可执行文件uts
[egon@www ~]$ sudo ./uts #需要root权限才能开辟新的container
Parent - start a container!
Container - inside the container!
[root@container egon]#      #进入一个隔离的空间,即一个container
[root@container egon]# hostname #查看该空间下的主机名
container
[root@container egon]# exit #退出该container
exit
Parent - container stopped!
[egon@www ~]$ hostname  #查看最初的空间下的主机名
www.egon.org #发现确实与刚刚我们开辟的container是不同的主机名,验证了隔离性
[egon@www ~]$
2.2 IPC命名空间(系统调用CLONE_NEWIPC)
IPC全称 Inter-Process Communication,是Unix/Linux下进程间通信的一种方式,IPC有共享内存、信号量、消息队列等方法。所以,为了隔离,我们也需要把IPC给隔离开来,这样,只有在同一个Namespace下的进程才能相互通信。如果你熟悉IPC的原理的话,你会知道,IPC需要有一个全局的ID,即然是全局的,那么就意味着我们的Namespace需要对这个ID隔离,不能让别的Namespace的进程看到。
文件名:ipc.c
要启动IPC隔离,我们只需要在调用clone时加上CLONE_NEWIPC参数就可以了(见下述代码标红的地方)
#define _GNU_SOURCE
#include <sys/types.h>
#include <sys/wait.h>
#include <stdio.h>
#include <sched.h>
#include <signal.h>
#include <unistd.h>

/* 定义一个给 clone 用的栈,栈大小1M */
#define STACK_SIZE (1024 * 1024)
static char container_stack[STACK_SIZE];

char* const container_args[] = {
    "/bin/bash",
    NULL
};

/* 与uts有关的代码:此处只演示主机名的隔离 */
int container_main(void* arg)
{
    printf("Container - inside the container!\n");
    sethostname("container",10); /* 设置hostname */
    execv(container_args[0], container_args);
    printf("Something's wrong!\n");
    return 1;
}

int main()
{
    printf("Parent - start a container!\n");
    int container_pid = clone(container_main, container_stack+STACK_SIZE,
            CLONE_NEWUTS | CLONE_NEWIPC | SIGCHLD, NULL); /*新增CLONE_NEWIPC就可以了 */
    waitpid(container_pid, NULL, 0);
    printf("Parent - container stopped!\n");
    return 0;
}
预备阶段(在全局新建IPC队列):
首先,我们先创建一个IPC的Queue(如下所示,全局的Queue ID是0)
ipcmk创建队列
ipcrm删除队列
ipcs查看队列
[egon@www ~]$ ipcs -q #查看队列

------ Message Queues --------
key        msqid      owner      perms      used-bytes   messages
[egon@www ~]$ ipcmk -Q #在全局创建一个ipc的队列,队列id为0
Message queue id: 0
[egon@www ~]$ ipcs -q #查看刚刚新建的全局的队列的信息

------ Message Queues --------
key        msqid      owner      perms      used-bytes   messages
0x0c076dce 0          egon       644        0            0
我们暂且不运行编译的CLONE_NEWIPC的程序ipc,让我们先运行之前编译的uts,发现在子进程中还是能看到这个全局的IPC Queue。
[egon@www ~]$ ipcs -q #查看全局的队列

------ Message Queues --------
key        msqid      owner      perms      used-bytes   messages
0x0c076dce 0          egon       644        0            0

[egon@www ~]$ sudo ./uts #进入新的uts容器
Parent - start a container!
Container - inside the container!
[root@container egon]# ipcs -q #在uts容器下发现仍然能看到全局的IPC队列,证明此时没有实现IPC隔离

------ Message Queues --------
key        msqid      owner      perms      used-bytes   messages
0x0c076dce 0          egon       644        0            0

[root@container egon]# exit #退出uts容器
exit
Parent - container stopped!
[egon@www ~]$
测试开辟一个新的IPC名称空间/容器container,验证IPC的隔离性:
[egon@www ~]$ gcc -o ipc ipc.c #编译
[egon@www ~]$ ipcs -q #在全局查看ipc队列,肯定可以看到

------ Message Queues --------
key        msqid      owner      perms      used-bytes   messages
0x0c076dce 0          egon       644        0            0

[egon@www ~]$ sudo ./ipc #进入ipc容器
Parent - start a container!
Container - inside the container!
[root@container egon]# ipcs -q #在容器内查看ipc队列,发现查看不到全局的ipc队列,自己这里的ipc队列为空,验证了ipc的隔离性
                               #同理如果在该容器内用ipcmk -Q创建的队列,在全局也无法看到,读者可以自行测试
------ Message Queues --------
key        msqid      owner      perms      used-bytes   messages

[root@container egon]# exit
exit
Parent - container stopped!
[egon@www ~]$
2.3 PID命名空间(系统调用CLONE_NEWPID)
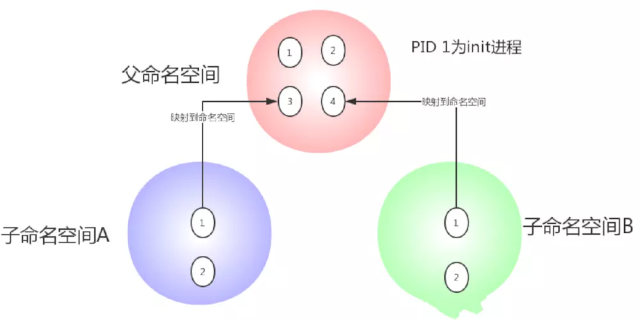
空间内的PID 是独立分配的,意思就是命名空间内的虚拟 PID 可能会与命名空间外的 PID 相冲突,于是命名空间内的 PID 映射到命名空间外时会使用另外一个 PID。比如说,命名空间内第一个 PID 为1,而在命名空间外就是该 PID 已被 init 进程所使用。
文件名:pid.c
基于ipc.c修改而来,见标红部分,其中只需新增CLONE_NEWPID就完全可实现PID的隔离,而此处我们即加了CLONE_NEWUTS又加了CLONE_NEWIPC,随后才添加了CLONE_NEWPID,代表的意思是:在UTS和IPC隔离的基础之上再进行PID的隔离,此时的容器已经越来越接近于在linux操作系统上新建一个隔离的操作系统了。
#define _GNU_SOURCE
#include <sys/types.h>
#include <sys/wait.h>
#include <stdio.h>
#include <sched.h>
#include <signal.h>
#include <unistd.h>

/* 定义一个给 clone 用的栈,栈大小1M */
#define STACK_SIZE (1024 * 1024)
static char container_stack[STACK_SIZE];

char* const container_args[] = {
    "/bin/bash",
    NULL
};

int container_main(void* arg)
{
    printf("Container [%5d] - inside the container!\n",getpid()); /* 此处的getpid()是为了获取容器的初始进程(init)的pid */
    sethostname("container",10); /* 设置hostname */
    execv(container_args[0], container_args);
    printf("Something's wrong!\n");
    return 1;
}

int main()
{
    printf("Parent [%5d] - start a container!\n",getpid()); /* 此处的getpid()则是为了获取父进程的pid */
    int container_pid = clone(container_main, container_stack+STACK_SIZE,
            CLONE_NEWUTS | CLONE_NEWIPC | CLONE_NEWPID | SIGCHLD, NULL); /*新增CLONE_NEWPID即可,此处代表在UTS和IPC隔离的基础之上再进行PID的隔离,其实我们完全可以只加CLONE_NEWPID自己:这样的话就只代表隔离PID了 */
    waitpid(container_pid, NULL, 0);
    printf("Parent - container stopped!\n");
    return 0;
}
测试开辟一个新的PID名称空间/容器container,验证PID的隔离性:
[egon@www ~]$ gcc -o pid pid.c #编译
[egon@www ~]$ sudo ./pid #进入一个新的容器
Parent [ 4520] - start a container!
Container [    1] - inside the container!
[root@container egon]# echo $$ #查看该容器的初始程序(init)ID为1,而全局的init程序的ID也为1,证明了二者的隔离性
1
[root@container egon]# hostname #因为我们在pid.c文件中加入了CLONE_NEWUTS,所以此时的主机名也是隔离的,看到的是自己的主机名
container
[root@container egon]# ipcs -q #因为我们在pid.c文件中也加入了CLONE_NEWIPC,所以此时的IPC也是隔离的,看不到全局新建的那个IPC队列

------ Message Queues --------
key        msqid      owner      perms      used-bytes   messages
ps:centos7之后使用systemd代替init,此处我们说的初始程序指的就是这二者,是一个意思

说明:在传统的UNIX系统中,PID为1的进程是init,地位非常特殊。他作为所有进程的父进程,有很多特权(比如:屏蔽信号等),另外,其还会为检查所有进程的状态,我们知道,如果某个子进程脱离了父进程(父进程没有wait它),那么init就会负责回收资源并结束这个子进程。所以,要做到进程空间的隔离,首先要创建出PID为1的进程,最好就像chroot那样,把子进程的PID在容器内变成1。
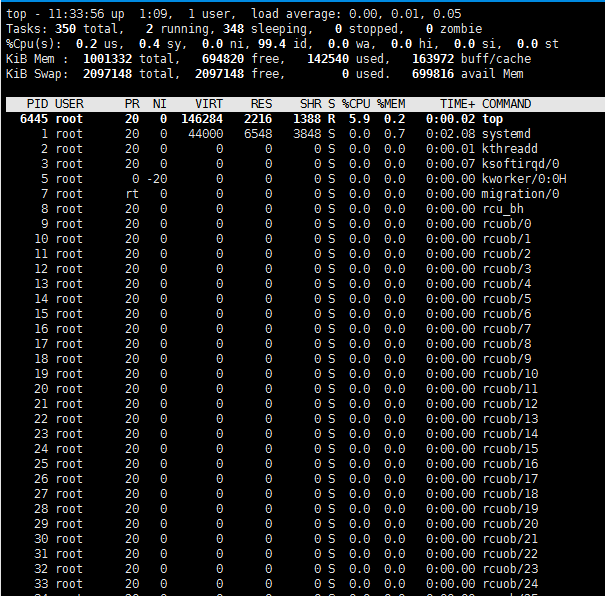
但是,我们会发现,在子进程的shell里输入ps,top等命令,我们还是可以看得到所有进程。说明并没有完全隔离。这是因为,像ps, top这些命令会去读/proc文件系统,所以,因为/proc文件系统在父进程和子进程都是一样的,所以这些命令显示的东西都是一样的。
所以,我们还需要对文件系统进行隔离,这就需要用到mount命名空间了
2.4 Mount命名空间(系统调用CLONE_NEWNS)
进程运行时可以将挂载点与系统分离,使用这个功能时,我们可以达到 chroot 的功能,而在安全性方面比 chroot 更高。
文件名:fs.c
#define _GNU_SOURCE
#include <sys/types.h>
#include <sys/wait.h>
#include <stdio.h>
#include <sched.h>
#include <signal.h>
#include <unistd.h>

/* 定义一个给 clone 用的栈,栈大小1M */
#define STACK_SIZE (1024 * 1024)
static char container_stack[STACK_SIZE];

char* const container_args[] = {
    "/bin/bash",
    NULL
};

int container_main(void* arg)
{
    printf("Container [%5d] - inside the container!\n", getpid());
    sethostname("container",10);
    /* 重新mount proc文件系统到 /proc下 */
    system("mount -t proc proc /proc");
    execv(container_args[0], container_args);
    printf("Something's wrong!\n");
    return 1;
}

int main()
{
    printf("Parent [%5d] - start a container!\n", getpid());
    /* 启用Mount Namespace - 增加CLONE_NEWNS参数 */
    int container_pid = clone(container_main, container_stack+STACK_SIZE,
            CLONE_NEWUTS | CLONE_NEWIPC | CLONE_NEWPID | CLONE_NEWNS | SIGCHLD, NULL);
    waitpid(container_pid, NULL, 0);
    printf("Parent - container stopped!\n");
    return 0;
}
我们基于上次pid容器,在没有mount隔离情况下查看/proc、ps aux、top等信息
[egon@www ~]$ sudo ./pid
Parent [ 6231] - start a container!
Container [    1] - inside the container!
[root@container egon]# ls /proc/
1    116   132   148  165   18   197  213  230  248  265   282  36    5005  57    63   73   83   938        diskstats    locks         sysrq-trigger
10   117   133   149  166   180  198  214  231  249  266   283  37    51    58    64   731  84   94         dma          mdstat        sysvipc
100  118   134   15   167   181  199  215  232  25   267   284  38    514   59    640  74   841  95         driver       meminfo       timer_list
101  119   135   150  168   182  2    216  233  250  268   285  39    515   5939  641  745  85   957        execdomains  misc          timer_stats
102  12    136   151  169   183  20   217  234  251  2682  29   3944  517   60    642  75   86   96         fb           modules       tty
103  120   137   152  17    184  200  218  235  252  2684  293  3946  52    6047  643  76   863  960        filesystems  mounts        uptime
104  121   138   153  170   185  201  219  236  253  269   294  3982  520   6048  644  77   864  97         fs           mpt           version
105  122   139   154  171   186  202  22   237  254  27    295  40    53    6052  645  78   87   98         interrupts   mtrr          vmallocinfo
106  123   14    155  172   187  203  220  238  255  270   296  41    532   6053  646  780  871  99         iomem        net           vmstat
......省略n行
[root@container egon]# ps aux
USER        PID %CPU %MEM    VSZ   RSS TTY      STAT START   TIME COMMAND
root          1  0.0  0.6  44000  6548 ?        Ss   10:24   0:02 /usr/lib/systemd/systemd --switched-root --system --deserialize 21
root          2  0.0  0.0      0     0 ?        S    10:24   0:00 [kthreadd]
root          3  0.0  0.0      0     0 ?        S    10:24   0:00 [ksoftirqd/0]
root          5  0.0  0.0      0     0 ?        S<   10:24   0:00 [kworker/0:0H]
root          7  0.0  0.0      0     0 ?        S    10:24   0:00 [migration/0]
root          8  0.0  0.0      0     0 ?        S    10:24   0:00 [rcu_bh]
root          9  0.0  0.0      0     0 ?        S    10:24   0:00 [rcuob/0]
root         10  0.0  0.0      0     0 ?        S    10:24   0:00 [rcuob/1]
root         11  0.0  0.0      0     0 ?        S    10:24   0:00 [rcuob/2]
root         12  0.0  0.0      0     0 ?        S    10:24   0:00 [rcuob/3]
root         13  0.0  0.0      0     0 ?        S    10:24   0:00 [rcuob/4]
root         14  0.0  0.0      0     0 ?        S    10:24   0:00 [rcuob/5]
root         15  0.0  0.0      0     0 ?        S    10:24   0:00 [rcuob/6]
root         16  0.0  0.0      0     0 ?        S    10:24   0:00 [rcuob/7]
root         17  0.0  0.0      0     0 ?        S    10:24   0:00 [rcuob/8]
root         18  0.0  0.0      0     0 ?        S    10:24   0:00 [rcuob/9]
root         19  0.0  0.0      0     0 ?        S    10:24   0:00 [rcuob/10]
root         20  0.0  0.0      0     0 ?        S    10:24   0:00 [rcuob/11]
root         21  0.0  0.0      0     0 ?        S    10:24   0:00 [rcuob/12]
root         22  0.0  0.0      0     0 ?        S    10:24   0:00 [rcuob/13]
root         23  0.0  0.0      0     0 ?        S    10:24   0:00 [rcuob/14]
root         24  0.0  0.0      0     0 ?        S    10:24   0:00 [rcuob/15]
......省略n行
初次之外还有top命令运行的截图
测试开辟一个新的MOUNT名称空间/容器container,验证MOUNT的隔离性:
[egon@www ~]$ gcc -o fs fs.c #编译
[egon@www ~]$ sudo ./fs #进入mount容器
Parent [ 6554] - start a container!
Container [    1] - inside the container!
[root@container egon]#    #此处便是新的容器了
[root@container egon]# ls /proc/ #浏览/proc内容,发现少了好多
1          bus       crypto     execdomains  iomem     keys        loadavg  modules  pagetypeinfo  slabinfo  sysrq-trigger  uptime
13         cgroups   devices    fb           ioports   key-users   locks    mounts   partitions    softirqs  sysvipc        version
acpi       cmdline   diskstats  filesystems  irq       kmsg        mdstat   mpt      sched_debug   stat      timer_list     vmallocinfo
asound     consoles  dma        fs           kallsyms  kpagecount  meminfo  mtrr     scsi          swaps     timer_stats    vmstat
buddyinfo  cpuinfo   driver     interrupts   kcore     kpageflags  misc     net      self          sys       tty            zoneinfo
[root@container egon]# ps aux #查看进程信息发现只能两个进程:一个初始进程id为1,另外一个就算ps命令本身
USER        PID %CPU %MEM    VSZ   RSS TTY      STAT START   TIME COMMAND
root          1  0.0  0.2 115384  2092 pts/0    S    11:35   0:00 /bin/bash
root         14  0.0  0.1 139500  1632 pts/0    R+   11:35   0:00 ps aux
除此之外执行top命令,发现包括top命令本身,也是只要两个进程
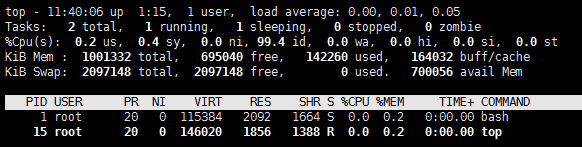
需要强调的一点是:在通过CLONE_NEWNS创建mount namespace后,父进程会把自己的文件结构复制给子进程中。而子进程中新的namespace中的所有mount操作都只影响自身的文件系统,而不对外界产生任何影响。这样可以做到比较严格地隔离。
并且我们完全可以根据自己的需要来为容器定制mount选项。
Docker的 Mount Namespace
下面就让我们来模拟制作一个镜像,模仿Docker的Mount Namespace
步骤一:
对于chroot来说,chroot 目录,然后切入到目录对应的名称空间下,同理,我们也需要为我们的mount namespace提供一个目录(即镜像),于是我们在/home/egon下新建目录rootfs