监控非携带metrics服务
一、怎么监控?
1、expertor
前面的系列中,我们在主机上面安装了node_exporter程序,该程序对外暴露一个用于获取当前监控样本数据的http的访问地址, 这个的一个程序成为exporter,Exporter的实例称为一个target, prometheus通过轮训的方式定时从这些target中获取监控数据。2、什么是expertor?
广义上向prometheus提供监控数据的程序都可以成为一个exporter的,一个exporter的实例称为target, exporter来源主要2个方面,一个是社区提供的,一种是用户自定义的。3、常用exporter
官方的exporter地址: https://prometheus.io/docs/instrumenting/exporters/4、nginx监控
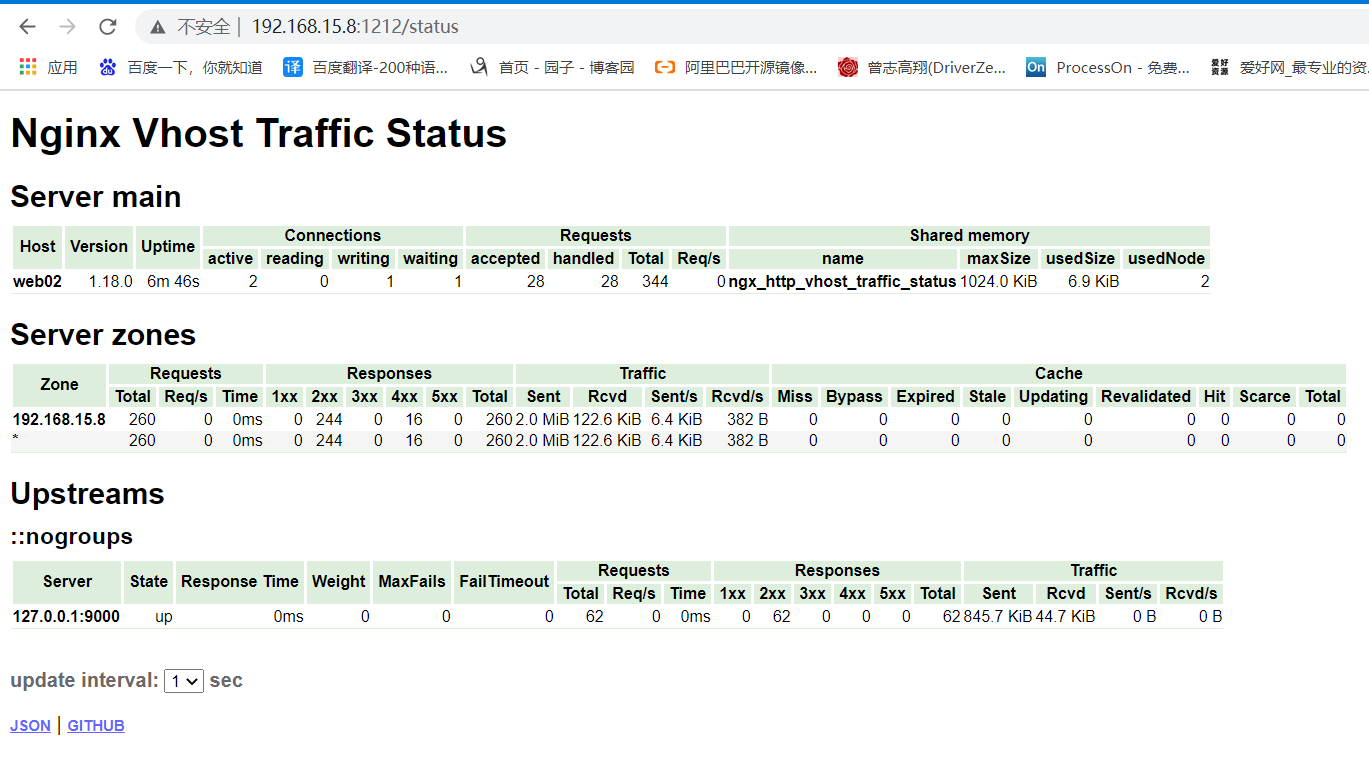
prometheus监控nginx使用nginx-vts-exporter采集数据。同时,需要nginx支持nginx-module-vts模块获取nginx自身的一些数据。二、监控流程
1、部署nginx添加nginx-module-vts
2、部署EndPrints,链接expertor暴露出来的metrics接口
3、部署Service,基于ServiceMonitor使用
4、创建ServiceMonitor,注入promethues
5、测试
6、加入grafana,做大屏展示
三、部署nginx-module-vts
1、获取第三方模块代码
[root@web02 ~]# mkdir /nginx_module
[root@web02 ~]# cd /nginx_module/
[root@web02 /nginx_module]# wget https://github.com/vozlt/nginx-module-vts/archive/refs/heads/master.zip
2、解压
[root@web02 /nginx_module]# unzip nginx-module-vts-master.zip3、下载安装包
[root@web02 ~]# wget https://nginx.org/download/nginx-1.18.0.tar.gz4、解压源码包
tar xf nginx-1.18.0.tar.gz 5、配置安装的环境(运行用户、安装目录等)
1.创建用户和组,且不创建用户的家目录
[root@web03 ~]# groupadd www -g 666
[root@web03 ~]# useradd www -u 666 -g 666 -s /sbin/nologin -M

2.创建一个安装目录
公司不指定安装目录时,默认安装到/usr/local/软件名/
公司指定的话,就要按照公司要求来
6、生成Makefile
[root@web02 ~/nginx-1.18.0]# ./configure --prefix=/usr/local/nginx-1.18.0 --user=www --group=www --without-http_gzip_module --with-compat --with-file-aio --with-threads --with-http_addition_module --with-http_auth_request_module --with-http_dav_module --with-http_flv_module --with-http_gunzip_module --with-http_gzip_static_module --with-http_mp4_module --with-http_random_index_module --with-http_realip_module --with-http_secure_link_module --with-http_slice_module --with-http_ssl_module --with-http_stub_status_module --with-http_sub_module --with-http_v2_module --with-mail --with-mail_ssl_module --with-stream --with-stream_realip_module --add-module=/nginx_module/nginx-module-vts-master --with-stream_ssl_module --with-stream_ssl_preread_module --with-cc-opt='-O2 -g -pipe -Wall -Wp,-D_FORTIFY_SOURCE=2 -fexceptions -fstack-protector-strong --param=ssp-buffer-size=4 -grecord-gcc-switches -m64 -mtune=generic -fPIC' --with-ld-opt='-Wl,-z,relro -Wl,-z,now -pie'7、编译安装
[root@web02 ~/nginx-1.18.0]# make && make install8、查看安装结果
[root@web02 ~/nginx-1.18.0]# ll /usr/local/nginx-1.18.0/
total 0
drwxr-xr-x 2 root root 333 Apr 26 16:21 conf
drwxr-xr-x 2 root root  40 Apr 26 16:21 html
drwxr-xr-x 2 root root   6 Apr 26 16:21 logs
drwxr-xr-x 2 root root  19 Apr 26 16:21 sbin

[root@web02 ~]# cd /usr/local/nginx-1.18.0/sbin
[root@web02 /usr/local/nginx-1.18.0/sbin]# ./nginx -V
...
--add-module=/nginx_module/nginx-module-vts-master
...
9、做软连接
[root@web02 /usr/local]# ln -s /usr/local/nginx-1.18.0 /usr/local/nginx10、配置环境变量
[root@web02 /usr/local]# vim /etc/profile.d/nginx.sh
export PATH=$PATH:/usr/local/nginx/sbin

[root@web02 /usr/local]# source /etc/profile    #在当前bash环境下读取并执行/etc/profile中的命令
11、加入system管理配置
[root@web02 /usr/local]# cat /usr/lib/systemd/system/nginx.service
[Unit]
Description=nginx - high performance web server
Documentation=http://nginx.org/en/docs/
After=network-online.target remote-fs.target nss-lookup.target
Wants=network-online.target

[Service]
Type=forking
PIDFile=/usr/local/nginx/logs/nginx.pid
ExecStart=/usr/local/nginx/sbin/nginx -c /usr/local/nginx/conf/nginx.conf
ExecReload=/usr/local/nginx/sbin/nginx -s reload
ExecStop=/usr/local/nginx/sbin/nginx -s stop

[Install]
WantedBy=multi-user.target

#重载
[root@web02 /usr/local]# systemctl daemon-reload
12、添加子配置文件夹
[root@web02 ~]# cd /usr/local/nginx/conf
[root@web02 /usr/local/nginx/conf]# mkdir conf.d
13、修改主配置文件
[root@web02 /usr/local/nginx/conf]# vim nginx.conf
...
user  nginx;
...
include /usr/local/nginx/conf/conf.d/*.conf;
...:
14、配置业务配置文件
这里我用了以前做的php业务,随便找个服务或者静态页面代替即可
server {
    listen       80;
    server_name  localhost;
        root /code/;

    location / {
        index  index.php index.html index.htm;
        root /code/;
    }

    location ~ \.php$ {
        fastcgi_pass  127.0.0.1:9000;
        fastcgi_index index.php;
        fastcgi_param SCRIPT_FILENAME /code$fastcgi_script_name;
        include       fastcgi_params;
    }
}