Linux操作系统优化
一、优化显示输出
vim /etc/bashrc 进入bashrc文件 按下41gg 跳转文件的41行 按下i键进入编辑模式,输入#,注释当前行,光标移动到#号前,按下回车键空出当前41行内容,而后光标移动到41行(空行位置),粘贴参数。而后按下ESC键,退出编辑模式,按下SHIFT+; wq 保存退出
[ "$PS1" = "\\s-\\v\\\$ " ] && PS1="[\[\e[34;1m\]\u@\[\e[0m\]\[\e[32;1m\]\H\[\e[0m\] \[\e[31;1m\]\w\[\e[0m\]]\\$ "或者用下面方法也一样
#设置
cat>/etc/profile.d/color.sh<<'EOF'
alias ll='ls -l --color=auto --time-style=long-iso'
PS1="\[\e[37;40m\][\[\e[32;1m\]\u\[\e[37;40m\]@\\h \[\e[36;40m\]\w\[\e[0m\]]\[\e[32;1m\]\\$ \[\e[0m\]"
export HISTTIMEFORMAT='%F-%T '
EOF

#生效
[root@egon ~]# source  /etc/profile
二、登录和欢迎信息
/etc/motd 登录成功后显示的信息示例
[root@localhost ~]# cat /etc/motd
+--------------------------------------------+
|                                            |
|    你当前登录的是支付业务后台数据库服务    |
|    请不要删库                              |
|                                            |
+--------------------------------------------+
了解
通常我们会清空/etc/issue、/etc/issue.net的内容,去除系统及内核版本登录前的屏幕显示

/etc/issue              登录画面显示的信息(重启机器后,在本机看到的登录界面内容)
/etc/issue.net          它提供给telnet远程登录程序使用的。默认情况下/etc/issue文件和/etc/issue.Net内容一样,如需要,可根据自己需要修改。

$ telnet 192.168.12.17 22  # 测试端口
Trying 192.168.12.17...
Connected to 192.168.12.17.
Escape character is '^]'. -----》表示已打开,其他情况表示端口未打开
SSH-2.0-OpenSSH_7.4
^]
telnet> quit

ps: telnet由于不安全已经很少使用了,都是以ssh代替。
三、配置yum仓库与包更新
一:先在测试环境,配置好yum源
默认国外的yum源(软件仓库)比较慢,所以换成国内的。
# 1.1、备份
[root@egon ~]# mv /etc/yum.repos.d/CentOS-Base.repo /etc/yum.repos.d/CentOS-Base.repo.backup

# 1.2、下载新的CentOS-Base.repo 到/etc/yum.repos.d/
[root@egon ~]# curl -o /etc/yum.repos.d/CentOS-Base.repo http://mirrors.aliyun.com/repo/Centos-7.repo

# 1.3.添加epel源
[root@egon ~]# curl -o /etc/yum.repos.d/epel.repo http://mirrors.aliyun.com/repo/epel-7.repo
二:刚装机后执行yum upgrade -y
[root@egon ~]# yum upgrade -y  # 刚装完系统后就立即执行,日后就不要轻易更新了

复习:
            在 CentOS 7 中,yum update 和 yum upgrade
            1、相同点:都会更新所有包(包括软件与内核)
            2、不同点
            yum update更新的时候会保留过时的包,这对依赖老包的应用很友好
            yum upgrade更新的时候会删除过时的包,如果你系统中所有的应用全都为rpm
            包,那upgrade倒是不会对你有影响,因为都会一起跟着更新。但是如果你
            安装的包里有自己编译安装的,而编译安装的包会依赖某个特定版本的rpm包
            那upgrade升级之后,很有可能会造成你编译安装包的不可用

            综上,如果是刚装系统,那就用upgrade,否则还是用update靠谱些

            在rockylinux中,yum命令都链接到了dnf-3上
            而在 DNF 中,,在dnf-3中,dnf update 与 dnf upgrade 是没有区别的。
            具体而言,两者都是用于更新系统上已经安装的软件包到最新可用版本
三、安装一些常用的库
yum install net-tools vim tree htop iftop iotop  bash-completion bash-completion-extras lrzsz sysstat sl lsof unzip telnet nmap nc psmisc dos2unix bash-completion wget  nethogs ntpdate nfsutils rsync glances gcc gcc-c++ glibc yum-utils httpd-tools -y

yum -y install tree nmap sysstat lrzsz  telnet bash-completion bash-completion-extras vim  lsof  net-tools rsync ntpdate nfs-utils
四、制作自己的yum源
如果你正在测试环境里演练,完成后再部生产环境
那么你应该在测试环境打开yum缓存,将yum install或update的包都缓存下来,然后做成自己的yum源带到生产环境,以确保版本可控
四、规范系统主机名
hostnamectl set-hostname 主机名 # 主机名能够反映出主机的作用即可五、添加hosts文件实现集群主机之间相互用主机名解析
vim /etc/hosts  # 编辑好之后,每台机器都发一份

172.16.10.11 nc1 ceph-deploy

172.16.10.12 nc2

172.16.10.13 nc3

172.16.10.14 cs1

172.16.10.15 cs2

172.16.10.16 cs3
六、关闭SELinux
    SELinux(Security-Enhanced Linux)是美国国家安全局(NSA)对于强制访问控制的实现,这个功能让系统管理员又爱又恨,这里我们还是把它给关闭了吧,至于安全问题,后面通过其他手段来解决,这也是大多数生产环境的做法,如果非要开启也是可以的。

#临时关闭
[root@egon ~]# setenforce  0

#永久关闭,修改完配置后重启主机
[root@egon ~]# sed 's#SELINUX=enforcing#SELINUX=disabled#g' /etc/selinux/config

#检查结果
[root@egon ~]# grep "disabled" /etc/selinux/config
七、关闭防火墙(Firewalld)
    关闭防火墙的目的是为了让初学者学习更方便,将来在学了Firewalld技术后可再统一开启。 在企业环境中,一般只有配置外网IP的linux服务器才需要开启防火墙,但即使是有外网IP,对于高并发高流量的业务服务器仍是不能开的,因为会有较大性能损失,导致网站访问很慢,这种情况下只能在前端加更好的硬件防火墙了。

# 临时关闭
[root@egon ~]# systemctl  stop firewalld

# 设置开机不启动
[root@egon ~]# systemctl  disable  firewalld

iptables -t raw -F # 清空规则
iptables -t mangle -F # 清空规则
iptables -t nat -F # 清空规则
iptables -t filter -F # 清空规则
八、配置自动同步时间
对于CentOS 7.9及以后的版本,Chrony是默认的网络时间服务。CentOS 7.9及以后的版本默认已经安装了Chrony,如果未安装,可以通过yum install chrony命令进行安装。
Chrony提供了一个名为chronyc的命令行工具,你可以使用这个工具来检查Chrony的状态,比如,我们可以通过运行chronyc sources来查看当前正在使用的时间源。
了解chronyd与ntpd的区别
Linux里面chrony和ntp区别是:
1.实现方式不同;
2.精度和稳定性不同;
3.系统资源消耗不同;
4.配置方法不同。实
现方式不同在于,chrony使用一种称为”时间滤波”的技术,
而ntp基于UDP协议的客户端-服务器架构的协议,使用的是传统的时间同步算法。

1.实现方式不同
chrony是一种相对较新的时间同步工具,它采用一种称为”时间滤波”的技术,
通过估计时钟漂移率,平滑时钟跳变和抖动,来提高时钟同步的精度和稳定性。

ntp是一种较为传统的时间同步工具,它基于UDP协议的客户端-服务器架构的协议,
通常使用传统的网络时间服务器,例如ntp官方提供的公共时间服务器或者其他网络中的时间服务器,
客户端向服务器发送时间同步请求,服务器返回当前时间并通过ntp协议进行时间校准。

2.精度和稳定性不同
chrony相对于ntp来说,能够提供更高的精度和更好的稳定性。chrony支持本地时钟缓存,
可以在没有网络连接时依然保持时钟的精度,同时可以快速适应网络延迟和时钟漂移。
此外,它还支持快速时钟校准和实时时钟补偿等功能。

3.系统资源消耗不同
chrony对系统资源的消耗相对较少,对于资源有限的系统来说更为适合;
而ntp则需要较多的系统资源,包括CPU、内存和网络带宽等,相对于chrony会消耗更多的系统资源。

4.配置方法不同
chrony的配置相对简单,配置文件相对较少,更加易于管理。而ntp的配置相对复杂,
需要编辑多个配置文件来实现不同的功能。

总的来说,chrony和ntp都是优异的时间同步工具,在不同的场景下可以选用不同的工具。
如果需要高精度、高稳定性以及对系统资源的消耗有限,则可以选择chrony;
如果对精度要求不高,而且需要一些比较复杂的功能,则可以选择ntp。
大前提:chrony服务端客户端配置完后,重启chronyd服务即可快速完成时间同步,在这之后就不要再手动去修改时间了,一切让时间服务器自己去同步
chrony服务端:服务端我们可以自己搭建,也可以直接用公网上的时间服务器,所以是否部署服务端看你自己
# 1、安装
yum -y install chrony
# 2、修改配置文件
mv /etc/chrony.conf /etc/chrony.conf.bak
cat > /etc/chrony.conf << EOF
server ntp1.aliyun.com iburst minpoll 4 maxpoll 10
server ntp2.aliyun.com iburst minpoll 4 maxpoll 10
server ntp3.aliyun.com iburst minpoll 4 maxpoll 10
server ntp4.aliyun.com iburst minpoll 4 maxpoll 10
server ntp5.aliyun.com iburst minpoll 4 maxpoll 10
server ntp6.aliyun.com iburst minpoll 4 maxpoll 10
server ntp7.aliyun.com iburst minpoll 4 maxpoll 10
driftfile /var/lib/chrony/drift
makestep 10 3
rtcsync
allow 0.0.0.0/0
local stratum 10
keyfile /etc/chrony.keys
logdir /var/log/chrony
stratumweight 0.05
noclientlog
logchange 0.5
EOF
# 4、启动chronyd服务
systemctl restart chronyd.service # 最好重启,这样无论原来是否启动都可以重新加载配置
systemctl enable chronyd.service
systemctl status chronyd.service
chrony客户端:在需要与外部同步时间的机器上安装,启动后会自动与你指定的服务端同步时间
本质上的配置与你服务端的都一样,无非就是指定跟哪个上游时间服务端同步时间,也就是说你安装了chrony它是即可充当客户端也可以充当服务端的
如果你没有自己的时间服务器服务端,那下面的配置中server你完全可以指定一些公共的时间服务器,例如
中国大陆地区的NTP服务器
ntp1.aliyun.com
ntp2.aliyun.com
ntp3.aliyun.com
ntp4.aliyun.com
ntp5.aliyun.com
ntp6.aliyun.com
ntp7.aliyun.com

ntp1.chinacloud.com.cn

ntp2.chinacloud.com.cn

ntp3.chinacloud.com.cn

cn.pool.ntp.org

公网时间服务器大全:https://blog.csdn.net/weixin_42588262/article/details/82501488
公网服务器配图

我们的chronyd客户端配置如下
# 下述步骤一次性粘贴到每个客户端执行即可
# 1、安装chrony
yum -y install chrony
# 2、需改客户端配置文件
mv /etc/chrony.conf /etc/chrony.conf.bak
cat > /etc/chrony.conf << EOF
server 服务端的ip地址或可解析的主机名 iburst
driftfile /var/lib/chrony/drift
makestep 10 3
rtcsync
local stratum 10
keyfile /etc/chrony.key
logdir /var/log/chrony
stratumweight 0.05
noclientlog
logchange 0.5

EOF
# 3、启动chronyd
systemctl restart chronyd.service
systemctl enable chronyd.service
systemctl status chronyd.service

# 4、验证
chronyc sources -v  # 结果解析如下图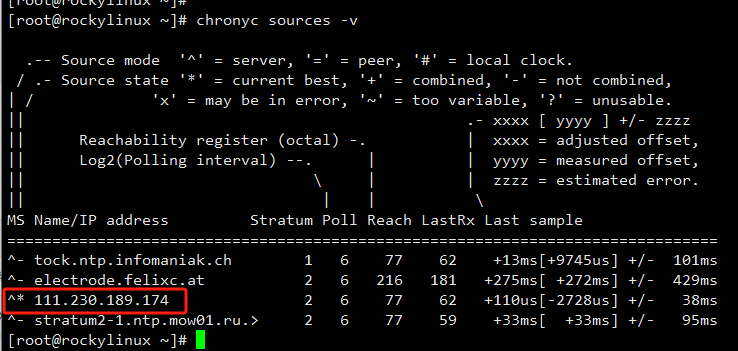
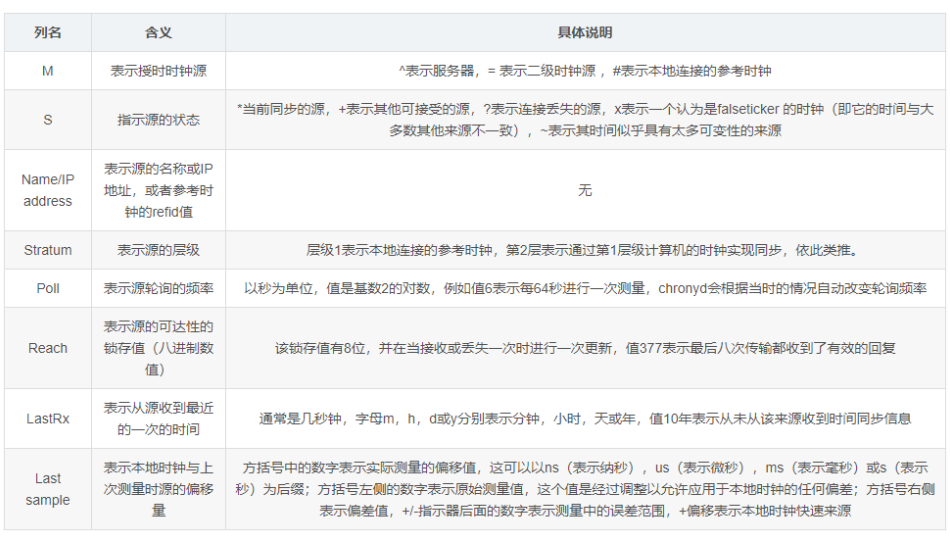
每一列的含义
centos6、centos7.9中也可以用ntpdate命令(了解即可)
yum install ntpdate -y # 安装客户端包
#给定时任务加上注释
[root@egon ~]# echo '#Timing synchronization time' >>/var/spool/cron/root

#定时任务
[root@egon ~]# echo '0 */1 * * * /usr/sbin/ntpdate ntp1.aliyun.com &>/dev/null' >>/var/spool/cron/root

#检查结果
[root@egon ~]# crontab -l
九、系统内核优化
9.1 ulimit命令介绍
我们可以ulimit命令对系统资源进行控制,选项如下
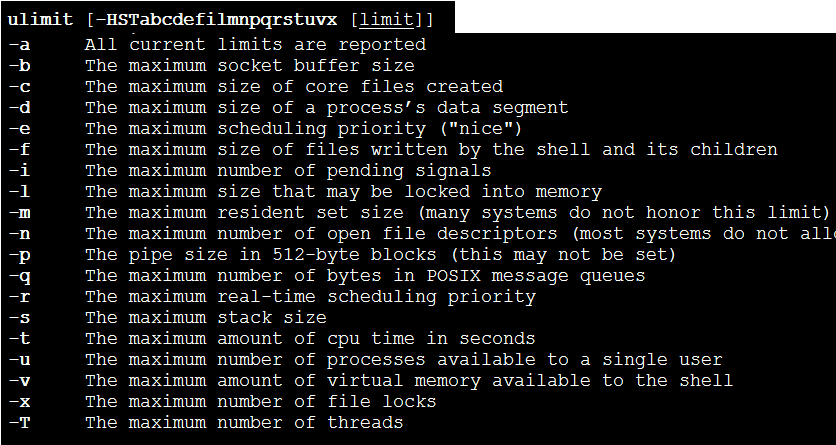
设置用户级所能打开的最大进程数目:-u选项
ulimit -u 3设置用户级所能分配到的文件描述符数量:-n选项
ulimit -n 12

# 这个值默认最大可以设置为1048576,
[root@localhost ~]# ulimit  -n 1048576
[root@localhost ~]# ulimit  -n 1048577
bash: ulimit: open files: cannot modify limit: Operation not permitted
9.2 控制用户开启的最大进程数目
[root@egon ~~]# useradd egon
[root@egon ~~]# ulimit -u 3  # 每个用户能同时开启的最大进程数均只有3个
[root@egon ~~]# su - egon  # 切换到egon用户下,先执行了一个bash解释器进程,此外还能再开俩个
[egon@egon ~~]$ sleep 1000 &
[1] 1435
[egon@egon ~~]$ sleep 2000 &
[2] 1436
[egon@egon ~~]$ sleep 3000 &
-bash: fork: retry: 资源暂时不可用
-bash: fork: retry: 资源暂时不可用
-......

# 注意:
1、ulimit -u 3是限制每个用户能同时开启的最大进程数均只有3,而不是累计到一起总共有3个
2、测试的时候sleep后的时间长一点,模拟出同时开启多个进程的效果,不然执行一条短命令很快就结束了
9.3 文件描述符
文件描述符
进程每打开一个文件,操作系统内核就会为该打开的文件分配一个编号(非负整数),该编号称之为文件描述符(File Descriptor)或者文件handle->也有人将其译为文件句柄

文件打开后的处理逻辑:
进程->文件描述符->操作系统内核->一个具体的文件
即内核(kernel)就是利用文件描述符(file descriptor)来访问文件

在程序设计中,一些涉及底层的程序编写往往会围绕着文件描述符展开。但是文件描述符这一概念往往只适用于UNIX、Linux这样的操作系统。

更多关于描述符的概念:https://www.cnblogs.com/linhaifeng/articles/13959014.html
进程每打开一个文件,操作系统就会为进程分配一个对应的文件描述符。文件描述符的数目是可以设置的,而一旦设置过小,进程会随着打开的文件数增多,因为达到了文件描述的上限而无法打开文件,从而抛出异常
# 文件描述符测试代码
[root@egon ~~]# cat test1.py
import os
import time
from threading import Thread

print(os.getpid())

def task(n):
    with open('%s.txt' %n,mode='wt') as f1:
        time.sleep(1000)

if __name__ == "__main__":
    count=1
    while True:
        Thread(target=task,args=(count,)).start()
        count+=1
        time.sleep(3)

[root@egon ~~]# cat test2.py
import os
import time
from threading import Thread

print(os.getpid())

def task(n):
    with open('egon%s.txt' %n,mode='wt') as f1:
        time.sleep(1000)

if __name__ == "__main__":
    count=1
    while True:
        Thread(target=task,args=(count,)).start()
        count+=1
        time.sleep(3)

[root@egon ~~]#

# 测试
[root@egon ~~]# ulimit -n 12  # 最大的文件描述符数为12,每个用户级进程能打开的最大文件数均只有12个
[root@egon ~~]# python test1.py &
[1] 1263
[root@egon ~~]# 1263

[root@egon ~~]# python test2.py &
[2] 1266
[root@egon ~~]# 1266

# 在另外一个终端查看
[root@egon ~~]# ll /proc/1263/fd
总用量 0
lrwx------. 1 root root 64 11月 12 18:18 0 -> /dev/pts/0  # 指向当前终端的标准输入
lrwx------. 1 root root 64 11月 12 18:18 1 -> /dev/pts/0  # 指向当前终端的标准正确输出
lrwx------. 1 root root 64 11月 12 18:18 2 -> /dev/pts/0  # 指向当前终端的标准错误输出
l-wx------. 1 root root 64 11月 12 18:18 3 -> /root/1.txt
l-wx------. 1 root root 64 11月 12 18:18 4 -> /root/2.txt
l-wx------. 1 root root 64 11月 12 18:18 5 -> /root/3.txt
l-wx------. 1 root root 64 11月 12 18:18 6 -> /root/4.txt
l-wx------. 1 root root 64 11月 12 18:18 7 -> /root/5.txt
[root@egon ~~]# ll /proc/1266/fd
总用量 0
lrwx------. 1 root root 64 11月 12 18:18 0 -> /dev/pts/0
lrwx------. 1 root root 64 11月 12 18:18 1 -> /dev/pts/0
lrwx------. 1 root root 64 11月 12 18:18 2 -> /dev/pts/0
l-wx------. 1 root root 64 11月 12 18:18 3 -> /root/egon1.txt
l-wx------. 1 root root 64 11月 12 18:18 4 -> /root/egon2.txt
l-wx------. 1 root root 64 11月 12 18:18 5 -> /root/egon3.txt
l-wx------. 1 root root 64 11月 12 18:18 6 -> /root/egon4.txt
l-wx------. 1 root root 64 11月 12 18:18 7 -> /root/egon5.txt

# 观察1263与1266这俩进程各自一旦打开的文件数目到达了12,就都会报错
[root@egon ~~]# Exception in thread Thread-10:
Traceback (most recent call last):
  File "/usr/lib64/python2.7/threading.py", line 812, in __bootstrap_inner
  File "/usr/lib64/python2.7/threading.py", line 765, in run
  File "test1.py", line 8, in task
IOError: [Errno 24] Too many open files: '10.txt'

Exception in thread Thread-11:
Traceback (most recent call last):
  File "/usr/lib64/python2.7/threading.py", line 812, in __bootstrap_inner
  File "/usr/lib64/python2.7/threading.py", line 765, in run
  File "test1.py", line 8, in task
IOError: [Errno 24] Too many open files: '11.txt'

Exception in thread Thread-10:
Traceback (most recent call last):
  File "/usr/lib64/python2.7/threading.py", line 812, in __bootstrap_inner
  File "/usr/lib64/python2.7/threading.py", line 765, in run
  File "test2.py", line 8, in task
IOError: [Errno 24] Too many open files: 'egon10.txt'
了解:系统级最大的文件描述符个数,即内核程序最大可以打开的文件数
Linux的/proc/sys/fs/file-max决定了当前内核可以打开的最大的文件句柄数。

# 查看当前的值:
cat /proc/sys/fs/file-max

这个值在kernel的文档里是这样描述的:
The value  in  file-max  denotes  the  maximum number of file handles that the
Linux kernel will allocate. When you get a lot of error messages about running
out of  file handles, you might want to raise this limit. The default value is
10% of  RAM in kilobytes.  To  change it, just  write the new number  into the
file:

意思是file-max一般为内存大小(KB)的10%来计算,如果使用shell,可以这样计算:
grep -r MemTotal /proc/meminfo | awk '{printf("%d",$2/10)}'

一般我们不需要主动设置这个值,因为该值会随着内存大小的变化而自动分配到内存的10%左右,除非这个值确实较小(可能有各种其他原因导致file-max没有设置为内存的10%),我们才需要设置

# 如何查看当前kernel的句柄:
[root@egon ~~]# cat /proc/sys/fs/file-nr
608 0   94306

file-nr在内核文档里得解释如下:
Historically, the three values in file-nr denoted the number of allocated file
handles,  the number of  allocated but  unused file  handles, and  the maximum
number of file handles. Linux 2.6 always  reports 0 as the number of free file
handles -- this  is not an error,  it just means that the  number of allocated
file handles exactly matches the number of used file handles.
过去,filenr中的三个值表示已分配的文件句柄数、已分配但未使用的文件句柄数以及最大文件句柄数。Linux2.6总是报告0作为空闲文件句柄的数量——这不是一个错误,它只是意味着分配的文件句柄的数量与使用的文件句柄的数量完全匹配。