
NFS 服务
一、NFS介绍
1.使用NFS解决了什么
1.为了实现文件共享
2.为了多台服务器之间数据一致
2.NFS 原理
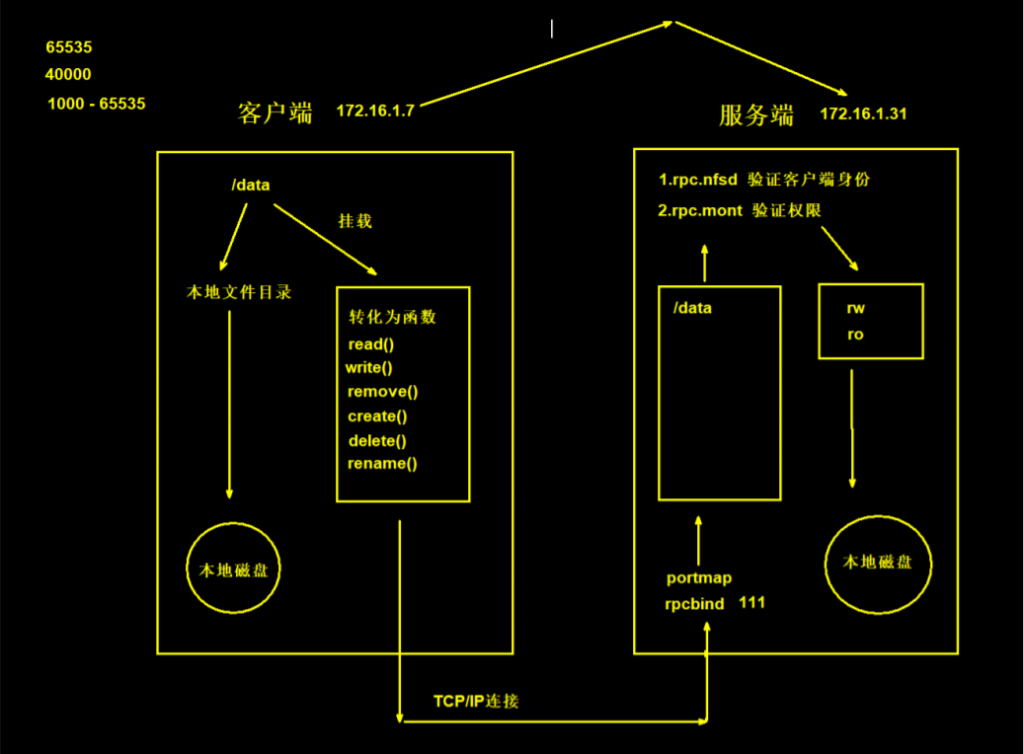
二、NFS实践
1.环境准备
| 主机 | IP | 角色 |
|---|---|---|
| web01 | 172.16.1.7 | NFS客户端 |
| nfs | 172.16.1.31 | NFS服务端 |
2.服务端(172.16.1.31)
1)关闭防火墙和selinux
2)安装NFS和rpcbind
[root@nfs ~]# yum install -y nfs-utils rpcbind

#注意:
Centos6 需要安装rpcbind
Centos7 默认已经安装好了rpcbind,并且默认是开机自启动
3)配置NFS
#NFS默认的配置文件是
[root@nfs ~]# ll /etc/exports
-rw-r--r--. 1 root root 0 Jun  7  2013 /etc/exports

#配置NFS
[root@nfs ~]# vim /etc/exports
/data 172.16.1.0/24(rw,sync,all_squash)| 语法 | /data | 172.16.1.0/24 | (rw,sync,all_squash) |
|---|---|---|---|
| 含义 | NFS服务端共享的目录 | NFS允许连接的客户端IP | 允许操作的权限,all_squash选项。这个选项会将客户端访问的所有用户和用户组都映射为匿名用户,并且这个匿名用户通常是nobody,更多选型见第四章节 |
4)创建共享目录
[root@nfs ~]# mkdir /data5)启动服务
#Centos7启动
[root@nfs ~]# systemctl start rpcbind nfs

#Centos6启动,一定要先启动rpcbind在启动nfs
[root@nfs ~]# /etc/init.d/rpcbind start
[root@nfs ~]# /etc/init.d/nfs start

[root@nfs ~]# service rpcbind start
[root@nfs ~]# service nfs start

#验证启动
[root@nfs ~]# netstat -lntp | grep rpc
tcp        0      0 0.0.0.0:111             0.0.0.0:*               LISTEN      5824/rpcbind
tcp        0      0 0.0.0.0:20048           0.0.0.0:*               LISTEN      10187/rpc.mountd
tcp        0      0 0.0.0.0:49150           0.0.0.0:*               LISTEN      10149/rpc.statd
tcp6       0      0 :::111                  :::*                    LISTEN      5824/rpcbind
tcp6       0      0 :::20048                :::*                    LISTEN      10187/rpc.mountd
tcp6       0      0 :::46384                :::*                    LISTEN      10149/rpc.statd
6)验证NFS配置
[root@nfs ~]# cat /var/lib/nfs/etab
/data   172.16.1.0/24(rw,sync,wdelay,hide,nocrossmnt,secure,root_squash,all_squash,no_subtree_check,secure_locks,acl,no_pnfs,anonuid=65534,anongid=65534,sec=sys,rw,secure,root_squash,all_squash)
3.客户端操作(172.16.1.7)
1)关闭防火墙和selinux
2)安装服务
[root@web01 ~]# yum install -y rpcbind nfs-utils3)查看挂载点
[root@web01 ~]# showmount -e 172.16.1.31
Export list for 172.16.1.31:
/data 172.16.1.0/24
4)挂载
[root@web01 ~]# mount -t nfs 172.16.1.31:/data /backup/

#验证挂载
[root@web01 ~]# df -h
Filesystem         Size  Used Avail Use% Mounted on
/dev/sda3           18G  1.6G   17G   9% /
devtmpfs           476M     0  476M   0% /dev
tmpfs              487M     0  487M   0% /dev/shm
tmpfs              487M   14M  473M   3% /run
tmpfs              487M     0  487M   0% /sys/fs/cgroup
/dev/sda1         1014M  127M  888M  13% /boot
tmpfs               98M     0   98M   0% /run/user/0
172.16.1.31:/data   18G  1.6G   17G   9% /backup
5)写入数据进行测试
#第一次写入测试
[root@web01 ~]# cd /backup/
[root@web01 backup]# touch 123.txt
touch: cannot touch ‘123.txt’: Permission denied    #没有权限
这是因为服务端设置的权限为all_squash,导致用户端操作nfs目录是都会转变为匿名用户nfsnobody,
这个用户默认在客户端都创建好了

#在服务端对源目录进行授权,这样客户端就可以在挂载点写数据了
[root@nfs ~]# chown -R nfsnobody.nfsnobody /data/

#客户端:再次创建测试
[root@web01 backup]# touch 123.txt
[root@web01 backup]# ll
total 0
-rw-r--r--. 1 nfsnobody nfsnobody     4 Mar 24 09:44 123.txt

#服务端查看
[root@nfs data]# ll
-rw-r--r--. 1 nfsnobody    nfsnobody        4 Mar 24 21:44 123.txt
三、NFS挂载与卸载
NFS客户端的配置步骤也十分简单。先使用showmount命令,查询NFS服务器的远程共享信息,其输出格式为“共享的目录名称 允许使用客户端地址(权限)”。

NFS挂载:客户端的目录仅仅是服务端共享目录的一个入口,可以简单理解为软连接,真正的数据全都是存储在服务端的目录,客户端写入的数据也是在服务端存储的
1.注意事项
1.挂载目录后,原来文件下的内容不会丢失,仅仅是被遮盖住,取消挂载后仍然存在
2.取消挂载时不要在挂载的目录下面操作,否则会提示忙碌,切换到其他目录再进行卸载
3.挂载是如果在挂载的目录下,还是可以看到挂载前目录下的文件,需要重新进入目录才会显示挂载后目录的内容
2.挂载
1)客户端安装
1.rpcbind:
    为了连接服务端的进程

2.nfs-utils
    为了使用showmount命令
2)客户端查看挂载点
[root@web01 ~]# showmount -e 172.16.1.31  # 客户端端查看,一定要跟上服务端的ip地址
Export list for 172.16.1.31:
/data 172.16.1.0/24
3)挂载命令
[root@web01 ~]# mount -t nfs 172.16.1.31:/data /backup
mount           #挂载命令
-t              #指定挂载的文件类型
nfs             #nfs文件类型
172.16.1.31      #服务端的IP地址
:/data          #服务端提供的可挂载目录
/backup         #本地要挂载到服务端的目录

#挂在后查看挂载
[root@web01 ~]# df -h | grep /backup
172.16.1.31:/data   18G  1.6G   17G   9% /backup
3.卸载
#卸载的两种方式
[root@web01 ~]# umount /backup
[root@web01 ~]# umount 172.16.1.31:/data

#强制取消挂载
[root@web01 ~]# umount -lf /backup
4.开机挂载
#编辑fstab文件
[root@web01 ~]# vim /etc/fstab
172.16.1.31:/data /backup nfs defaults 0 0

#验证fstab是否写正确
[root@web01 ~]# mount -a
四、NFS配置详解
[root@nfs ~]# cat /etc/exports
/data 172.16.1.0/24(rw,sync,all_squash)| nfs共享参数 | 参数作用 |
|---|---|
| rw | 读写权限 (常用) |
| ro | 只读权限 (不常用) |
| root_squash(默认) | 当NFS客户端以root管理员访问时,它把客户端的root用户(UID为0)映射为一个匿名用户,通常是nobody(centos7)或nfsnobody(centos7),这取决于具体的系统。这样做的目的是防止客户端的root用户在NFS共享上获取到全权限 (不常用) |
| no_root_squash | 上面root_squash的反义词,当NFS客户端以root管理员访问时,此选项取消了root_squash的设置,允许客户端的root用户在NFS共享上拥有这个共享中文件的完全控制权,就像它在本地系统上做的那样。这将带来一定的安全风险,因为客户端的root用户将能够修改NFS共享上的任何文件。 (不常用) |
| all_squash | 这个选项会使得所有来自客户端的用户和用户组,无论是root还是普通用户,都被映射为一个匿名的用户和用户组。 (常用) |
| no_all_squash | 此选项取消了all_squash的设置,不会把所有用户和用户组映射为匿名,每个用户根据其UID和GID被单独映射。 (不常用) |
| sync | 同时将数据写入到内存与硬盘中,保证不丢失数据 (常用) |
| async | 优先将数据保存到内存,然后再写入硬盘;这样效率更高,但可能会丢失数据 (不常用) |
| anonuid | 配置all_squash使用,指定NFS的用户UID,必须在服务端创建一个拥有该UID的用户,并且chown -R设置给共享目录,客户端最好也有一个一模一样的用户来保持一致,但没有的话其实也能用 (常用) |
| anongid | 配置all_squash使用,指定NFS的用户UID,同上 (常用) |
五、统一用户
假设有两台web需要共享一份存储,那么每台机器上的服务都涉及到要以某种用户身份运行起来
| 主机 | IP | 身份 |
|---|---|---|
| web01 | 10.0.0.7 | NFS客户端 |
| web02 | 10.0.0.8 | NFS客户端 |
| nfs | 172.16.1.31 | NFS服务端 |
我们最好做到用户统一,这样方便管理,并且采用普通用户启动,这样安全
5.1 所有服务器创建统一用户
最好所有主机都创建一份一模一样的用户,这样方便管理
沿途所有应用的用户都保持一致-规范
[root@web01 ~]# groupadd www -g 666
[root@web01 ~]# useradd www -u 666 -g 666

[root@web02 ~]# groupadd www -g 666
[root@web02 ~]# useradd www -u 666 -g 666

[root@nfs ~]# groupadd www -g 666
[root@nfs ~]# useradd www -u 666 -g 666
5.2 让服务以www用户启动
以nfs服务为例
主要就是改两块
1、服务的的启动用户
2、服务相关的文件目录权限
[root@nfs ~]# vim /etc/exports
/data 172.16.1.0/24(rw,sync,all_squash,anonuid=666,anongid=666)

#授权/data目录
[root@nfs ~]# chown -R www.www /data/

#重启服务
[root@nfs ~]# systemctl restart nfs-server.service

#验证启动用户
[root@nfs ~]# cat /var/lib/nfs/etab
/data   172.16.1.0/24(rw,sync,wdelay,hide,nocrossmnt,secure,root_squash,all_squash,no_subtree_check,secure_locks,acl,no_pnfs,anonuid=666,anongid=666,sec=sys,rw,secure,root_squash,all_squash)
其他沿途的服务,涉及到配置启动用户的、文件目录的,也都设置成www用户与组
六、NFS小结
1.NFS存储优点
1.NFS文件系统简单易用、方便部署、数据可靠、服务稳定、满足中小企业需求
2.NFS文件系统内存放的数据都在文件系统之上,所有数据都是能看得见
2.NFS存储局限
1.存在单点故障, 如果构建高可用维护麻烦  web -> nfs -> backup
2.NFS数据明文, 并不对数据做任何校验
3.客户端挂载NFS服务没有密码验证, 安全性一般(内网使用)
3.NFS应用建议
1.生产场景应将静态数据尽可能往前端推, 减少后端存储压力
2.必须将存储里的静态资源通过CDN缓存 jpg\png\mp4\avi\css\js
3.如果没有缓存或架构本身历史遗留问题太大, 在多存储也无用
作业:
0.虚拟机恢复快照
1.两台web服务器
2.一台nfs服务器挂载给所有web服务器的文件目录