Nginx优化下
一、防资源盗链
1.配置被盗连的网站
[root@web01 conf.d]# vim linux.beidaolian.com.conf
server {
    listen 8080;
    server_name linux.beidaolian.com 192.168.71.15;

    location ~* \.(png|jpg|gif)$ {
        root /usr/share/nginx/html/;
    }
}
[root@web01 ~]# systemctl restart nginx

#准备好静态文件
[root@web01 ~]# ls /usr/share/nginx/html/static/img/
1.jpg
2.配置盗链的网站
[root@lb01 ~]# vim /etc/nginx/conf.d/linux.daolian.com.conf
server {
    listen 8081;
    server_name linux.daolian.com 192.168.71.14;

    location ~* / {
        root /usr/share/nginx/html/;
        index index.html;
    }
}
[root@lb01 ~]# systemctl restart nginx

#准备站点
[root@lb01 ~]# vim /usr/share/nginx/html/index.html
<html>
    <body>
        <img src="http://linux.beidaolian.com:8080/static/img/1.jpg">
    </body>
</html>
3.配置hosts访问测试
192.168.71.14 linux.daolian.com
192.168.71.15 linux.beidaolian.com

#windows访问
http://linux.daolian.com:8081
4.配置防盗链语法
# 0、储备知识
"Referer"是HTTP请求头的一个字段,当你点击一个链接或者提交一个表单跳转到另一个页面时,
浏览器会自动添加这个Referer字段,用来告诉服务器你是从哪个页面跳转过来的。
例如,如果你在A页面点击了一个链接跳转到B页面,那么在发送请求B页面的时候,浏览器会在请求头里加上Referer: A的URL,
这样服务器就知道你是从A页面跳转过来的。
需要注意的是,由于隐私保护等原因,现在有一些浏览器或者插件提供了可以修改或者阻止发送Referer的功能,因此在某些情况下,
服务器可能无法获取到真实的Referer。此外,如果用户直接在浏览器地址栏中输入URL以访问页面,则该请求的Referer字段将为空。
盗链网站用img标签直接指向我们的站点时,Referer字段也为空,我们防盗链的核心原理就是检测该字段

# 1、介绍
valid_referers是Nginx中用于检查HTTP Referer请求头部字段的指令,主要用于防止资源被其他站点盗用。

# 2、定义位置
server, location

# 3、语法
以下是valid_referers指令的语法:
valid_referers none | blocked | server_names | string ...;

valid_referers指令可以接受多个参数,并且这些参数可以是以下几种类型:

1、none:该参数匹配那些没有Referer头字段的请求。例如,用户直接在浏览器的地址栏中输入URL访问的请求。
2、blocked:该参数匹配那些Referer头字段被防火墙或者代理服务器删除,或者是被客户端软件修改为"-"的请求。
3、server_names:该参数匹配当前server块中定义的server_name。例如,如果你在server块中定义了server_name www.example.com;,那么server_names将匹配来自www.example.com的请求。
4、string:字符串可以是任何你定义的特定域名。当然,星号(*)也被视为有效的字符,可以用来匹配子域名。例如,*.example.com将匹配所有以.example.com结尾的域名。
5.在被盗链主机配置防盗链
[root@web01 conf.d]# vim linux.beidaolian.com.conf
server {
    listen 8080;
    server_name linux.beidaolian.com 192.168.71.15;

    location ~* \.(png|jpg|gif)$ {
        root /usr/share/nginx/html/;

        valid_referers none blocked server_names; # server_names默认只包含我们自己的域名
        if ($invalid_referer) {
           return 500;
        }
    }
}访问:http://linux.daolian.com:8081 图片裂了,F12查看图片请求报错500
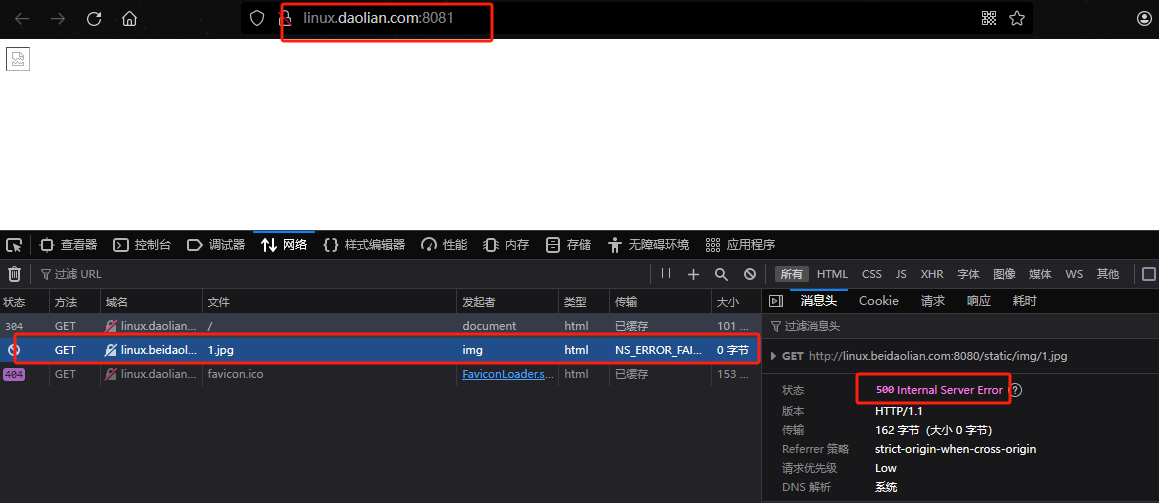
注意:测试的时候要清理一下浏览器缓存,因为图片可能已经缓存到你本地了,即便你防了盗链也发现仍然可以访问,其实访问的时本地缓存
6.伪造请求头骗过防盗链
示例
curl -H "User-Agent: MyUserAgent" -H "Referer: http://example.com" "http://target.com"

其他参数
-e 或 --referer:这个选项允许你设置HTTP请求的Referer字段
-I 或 --head:这个选项告诉curl只需要请求资源的头部信息,而不需要下载整个资源。这可以用来快速检查一个URL的状态,或者获取某些头部信息。
curl -H "User-Agent: MyUserAgent" -e "http://example.com" "http://target.com"
windows打开cmd测试
#模拟请求头中Refer为 被盗链的站点去访问图片,即可骗过目标站点
C:\Users\18611>curl -H "Refer: http://linux.beidaolian.com:8080" -I http://linux.beidaolian.com:8080/static/img/1.jpg
HTTP/1.1 200 OK
Server: nginx/1.24.0
Date: Sun, 31 Mar 2024 14:06:57 GMT
Content-Type: image/jpeg
Content-Length: 68713
Last-Modified: Fri, 22 Mar 2024 05:12:44 GMT
Connection: keep-alive
ETag: "65fd134c-10c69"
Accept-Ranges: bytes
虽然这样可以骗过防盗链,但你不用慌,因为我们防的根部不是上面这种行文,而是防止img标签直接引用的行文,防止某个人搭个站点网页内的所有img都盗我们的,这就够了。
至于那些不是正常在浏览器中访问我们的站点,而是伪造请求头来抓取我们的图片的这种行为,当然也是不好的,但那是反爬虫领域的事情了
7.允许某些域名盗链
[root@web01 conf.d]# vim linux.beidaolian.com.conf
server {
    listen 8080;
    server_name linux.beidaolian.com 192.168.71.15;

    location ~* \.(png|jpg|gif)$ {
        root /usr/share/nginx/html/;

        valid_referers none blocked server_names *.baidu.com; # 多加个*.baidu.com
        if ($invalid_referer) {
           return 500;
        }
    }
}

C:\Users\18611>curl -e "www.baidu.com" -I http://linux.beidaolian.com:8080/static/img/1.jpg
HTTP/1.1 200 OK
Server: nginx/1.24.0
Date: Sun, 31 Mar 2024 14:19:02 GMT
Content-Type: image/jpeg
Content-Length: 68713
Last-Modified: Fri, 22 Mar 2024 05:12:44 GMT
Connection: keep-alive
ETag: "65fd134c-10c69"
Accept-Ranges: bytes
二、配置允许跨域
2.1. 跨域问题与同源策略
你访问某个站点用到的”协议+域名+端”称之为一个域,例如你访问egon的技术星球
用的域就是http://www.egonlin.com:80
你访问百度用的域名是http:/www.baidu.com:80
一个域也被称之为一个源
 “源”由三个部分组成:协议(protocol)、域名(domain),和端口号(port)。
只有当这三部分完全匹配时,两个URL才被认为是“同源”的。
当你在某个站点内进行访问的时候,触发访问了另外一个域,则称之为跨域访问
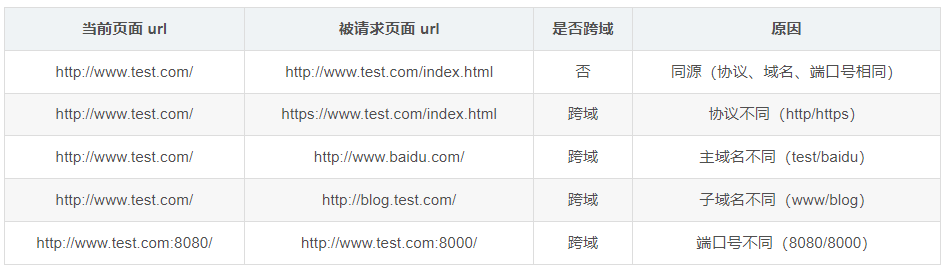
针对跨域访问,浏览器基于安全考虑,内置了一种机制叫同源策略,同源策略不限制跨域的请求包,但是跨域请求得到的响应包会被浏览器丢弃,即同源策略不允许你跨域访问对方的数据
浏览器这么做的意义在于:
1、隔离不同源的网站:一个网站(A源)的JavaScript无法直接访问到其他网站(B源)的数据,这对于用户数据的保密性和完整性来说十分重要。否则,B源网站的脚本就能直接读取到A源网站的敏感数据,例如用户邮件、密码等。
2、保护cookie:cookie是网站用来保存用户信息,如登录状态和身份信息的一种方法。同源策略防止了其他源的网站访问这些cookie,因此可以防止他人冒充用户身份,保障用户隐私。
3、限制DOM访问:同源策略可以阻止脚本访问跨源的DOM节点,避免脚本被恶意代码利用来获取或操控网页的内容。
同源策略带来的安全保证
补充:
浏览器的同源策略与跨站请求伪造攻击是两个不相干的东西
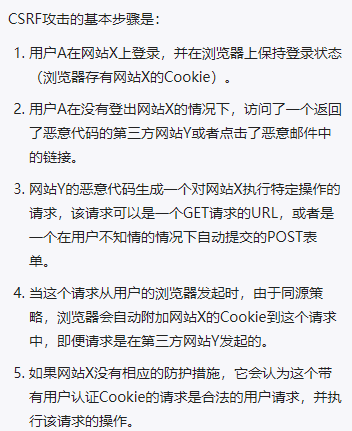
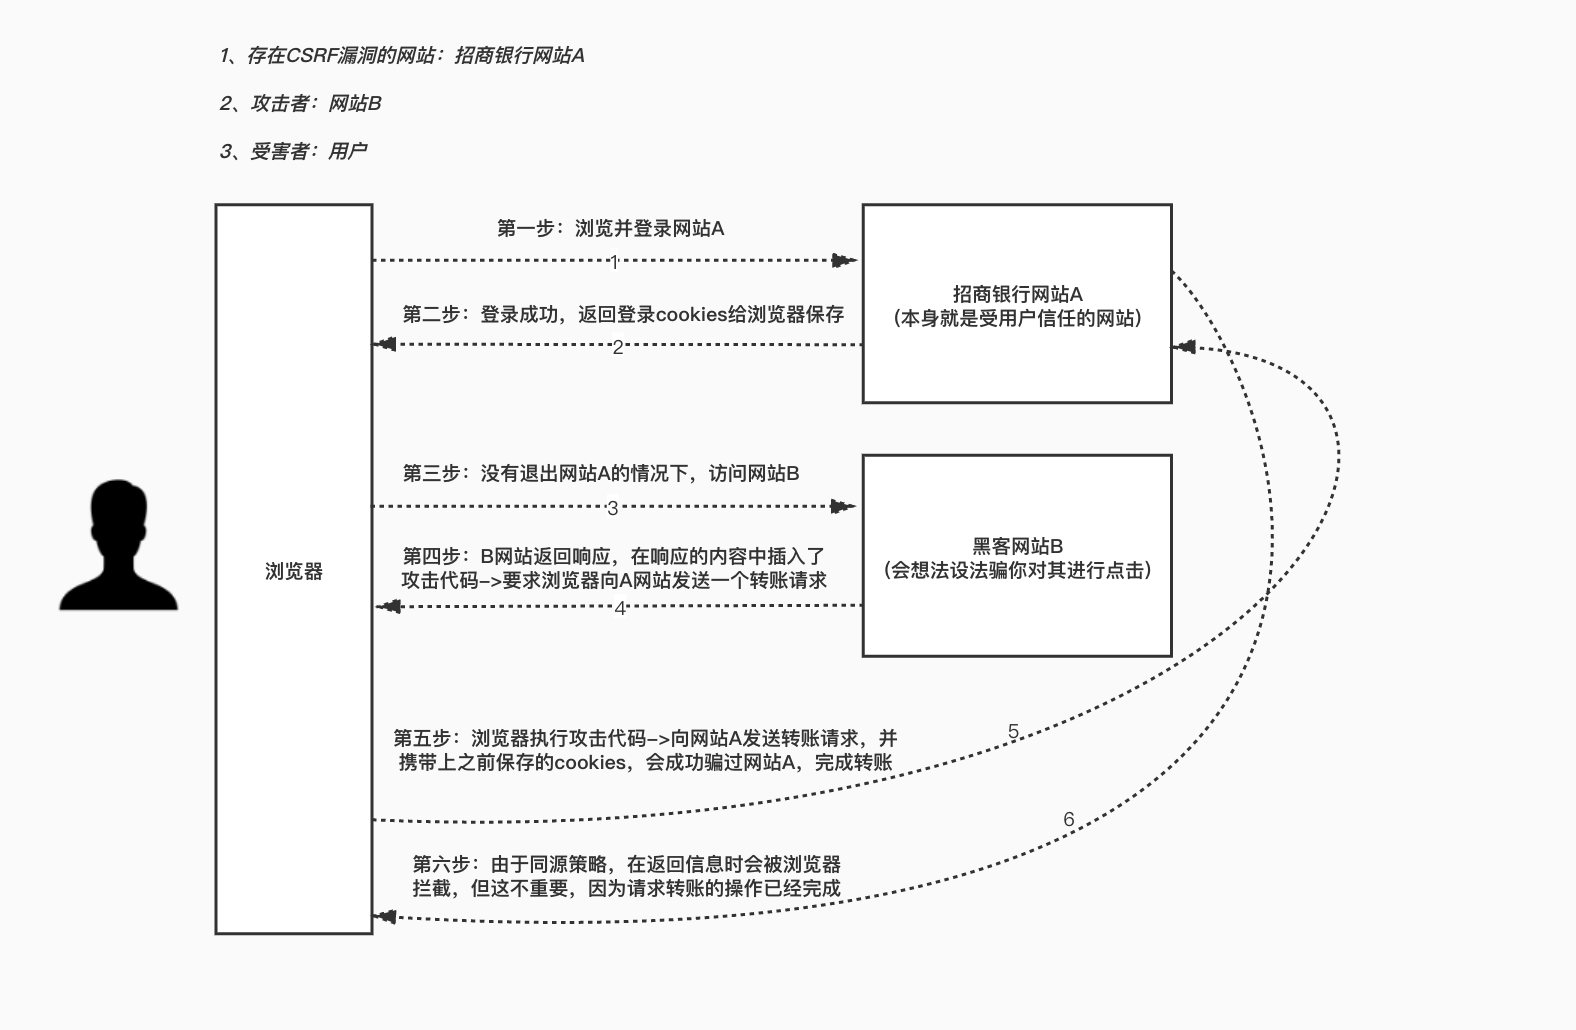
1、什么是CSRF攻击
跨站请求伪造攻击(CSRF),是利用了用户之前已经认证过的身份(比如登录后的cookie信息),在用户不知情的情况下,用用户的身份去做不良的操作。这里的关键是,恶意行为在于发送请求,而并不需要读取响应。同源策略对于防止CSRF帮助不大,因为同源策略并不能阻止恶意网站发起跨站请求只是限制响应包。
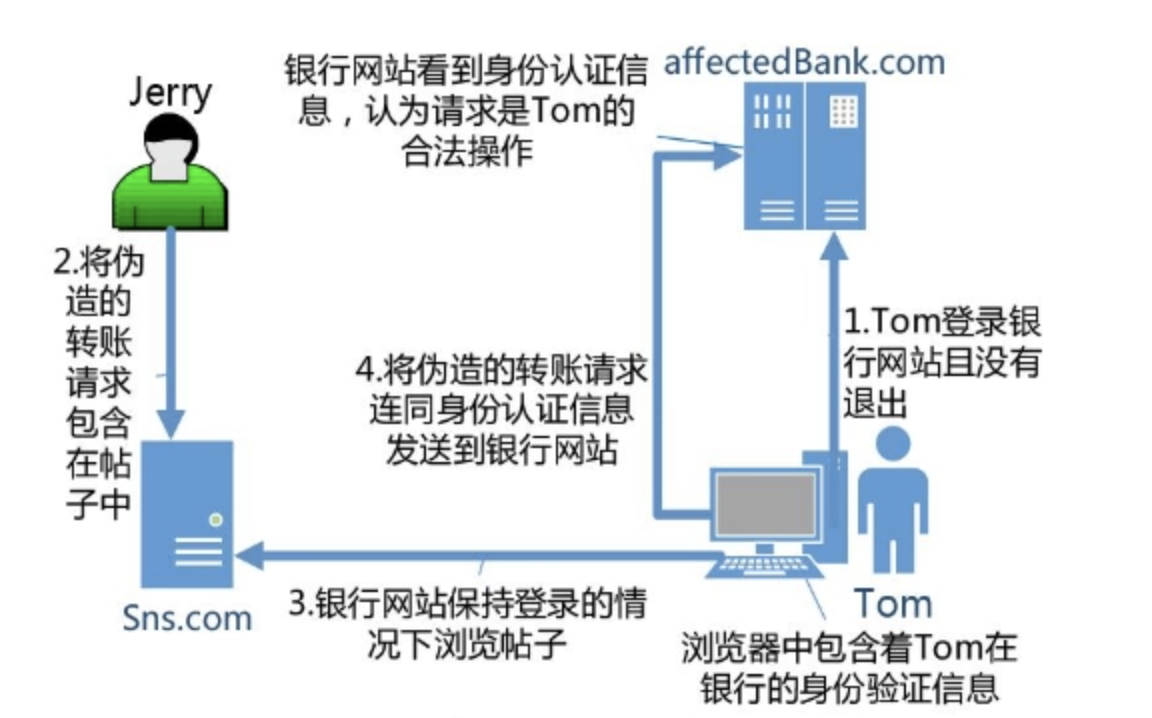
2、跨站请求伪造攻击案例:
假设你在银行网站(www.mybank.com)上登录,这个网站在你的计算机上设置了一个cookie用于识别你的身份和保持你的登录状态。
接着,你在另一个窗口或者标签页中访问了一个恶意网站(www.badguy.com)。假想这个恶意网站包含了以下
var img = new Image();
img.src = "https://www.mybank.com/transfer?acc=badguy&amount=10000";
这段代码试图去创建一个新的图像,但图像的源URL指向你的银行网站的一个转账API。这个转账API就好像是一个HTTP的GET请求,参数包含了收款人(这里是"badguy")和转账的金额(这里是"10000")。
浏览器在试图加载图片时,会向这个URL发送一个GET请求。但因为这个URL指向的实际上是银行网站的一个API,浏览器会自动带上与这个网站相关的所有cookie,这就相当于以你的身份发送了一个转账请求。
如果银行的后台服务器不能有效地防止CSRF攻击,而且没有对这类操作进行二次验证(比如转账金额的上限,或者需要输密码等),那么,攻击者就可能利用这种方式,盗取你的资金。
值得注意的是,同源策略确实无法直接防止这种攻击,因为它限制的是从一个源向另一个源获取数据,而不是发送请求
3、跨站请求伪造攻击的防止有效方法是:
网站会在用户发送请求时,附带一个在服务端生成的token(称之为CSRF tokens),服务端在收到请求时,
会检查这个token,只有当这个token是合法的,才会处理这个请求,从而预防了CSRF。csrf攻击案例(点击恶意链接,恶意链接朝着目标站点发请求,因为同源策略,发的时候自动带上该网站的cookie登录信息)
2.2. 允许跨域的场景
浏览器的同源策略就摆在那里,跨域请求的响应包默认就是会被浏览器丢弃掉,但是目标站点可以在响应包的头里告诉浏览器,你不用好心帮我了,我非常确定允许这个跨域请求,所以请放行我这个跨域请求的响应包吧,那此时浏览器就会放行。
什么场景下目标站点会这么做呢?
前后端分离开发
前端单独部署一个项目监听的地址为:192.168.71.8080,后端单独部署一个项目监听的地址为:192.168.72.8081
前端需要跨域发送请求给后端程序,后端程序需要配置允许跨域,以保证响应包抵达浏览器后会被同源策略放行
2.3、后端程序配置允许跨域
我们有一个前后端分离的项目
1、先部署一个单独的前端程序:web服务用nginx,web应用就是一个index.html页
# 1、web服务的配置如下
[root@localhost html]# cat /etc/nginx/conf.d/web01.conf
server {
listen 8081;
server_name www.frontend.com 192.168.71.14;
location ~* / {
root /usr/share/nginx/html/;
index index.html;
}
}
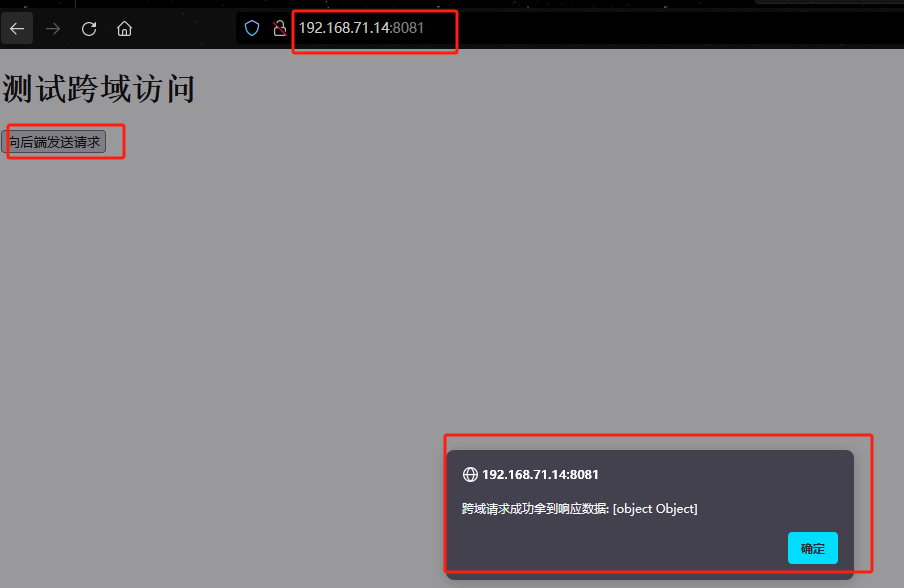
# 2、部署的web应用程序index.html内容如下
[root@localhost html]# cat /usr/share/nginx/html/index.html
<!doctype html>
<html lang="en">
<head>
<meta charset="UTF-8"/>
<title>测试ajax和跨域访问</title>
</head>
<body>
<h1>测试跨域访问</h1>
<button id="btn">向后端发送请求</button>
</body>
<script src="http://libs.baidu.com/jquery/2.1.4/jquery.min.js"></script>
<script>
$("#btn").click(function () {
$.ajax({
type: "GET",
url: "http://192.168.71.15:8080/userinfo/name=egon",
success: function (data) {
alert("跨域请求成功拿到响应数据: " + data);
},
error: function () {
alert("跨域请求发出后,响应包被浏览器屏蔽掉了");
}
});
});
</script>
</html>2、再部署一个单独后端程序,并且配置允许跨域
# 后端程序我就偷个懒,应用程序我就不写了,直接用nginx来响应接口请求return返回json数据
[root@web01 ~]# cat /etc/nginx/vhosts/www.egonlin.com.conf
server {
    listen 8080;
    server_name www.backend.com 192.168.71.15;

    location /userinfo {
        #以下为解决跨域问题
        add_header 'Access-Control-Allow-Origin' '*';
        add_header 'Access-Control-Allow-Credentials' 'true';
        add_header 'Access-Control-Allow-Methods' 'GET,PUT,POST,DELETE,OPTIONS';
        add_header 'Access-Control-Allow-Headers' 'Content-Type,*';

        default_type application/json;
        return 200 '{"name":"egon","age":18}';
    }
}
解释
Access-Control-Allow-Origin:表示服务器可以接受所有的请求源(Origin),即接受所有跨域的请求。
Access-Control-Allow-Methods:明确了客户端所要访问的资源允许使用的方法或方法列表。
Access-Control-Allow-Headers:设置预检请求。
你可以注释这些跨域相关配置,然后访问前端程序http://192.168.71.14:8081/来进行测试
三、CPU亲和
3.1、worker_cpu_affinity 的指令介绍
Nginx 提供了一种名为 worker_cpu_affinity 的指令,可以让你指定 Nginx worker 进程与特定 CPU 核心之间的亲和性,也就是把某个或某些 worker 进程绑定到具体的 CPU 核心上运行。通过设置 CPU 亲和性,你可以提高 Nginx 的性能,因为当进程始终在同一个 CPU 核心上执行时,可以利用 CPU 的缓存,从而减少内存访问延迟。
下面是一些用法示例:
- 1、绑定每一个 worker 进程到一个具体的 CPU 核心:
# 示例1、如果有个4核
worker_processes  4;
worker_cpu_affinity 0001 0010 0100 1000; # 4个核心,就用4位bit,哪一位为1则代表用第几颗
===
# 示例2、如果有16核
worker_processes    16;
worker_cpu_affinity 0000000000000001 0000000000000010 0000000000000100 0000000000001000 ...;
上述示例1中,worker_processes 表示总共有 4 个 worker 进程,每行的 worker_cpu_affinity 分别对应一个二进制数,用来表示该 worker 进程应被绑定到哪个 CPU 核心上。这种配置方式在你精确知道服务器有多少 CPU 核心,并且希望将进程直接绑定到特定核心上时非常有用。
- 2、自动分配 worker 进程到所有可用的 CPU 核心:
worker_processes  auto;
worker_cpu_affinity auto;
以上配置将会自动检测你的机器有多少个 CPU 核心,并尝试将每个 worker 进程绑定到一个独立的 CPU 核心上。这种配置方式在你不确定服务器具体有多少 CPU 核心,或者不希望手动指定进程绑定的核心时非常有用。
设置 CPU 亲和性后,worker 进程在运行时将始终在同一个 CPU 核心上执行,从而更有效地利用 CPU 的缓存,减少内存访问延迟,提高整体性能。 - 但也需要注意,如果服务器同时运行着其他 CPU 密集型任务,设置 CPU 亲和性可能并不能产生显著的性能提升,甚至可能会降低性能,因为这可能导致 CPU 核心的过度使用。
- 在实际应用中,你可能需要根据你的服务器的特定情况进行调整和优化。
3.2 使用案例
1、查看cpu状态确认有几个核
[root@web01 ~]# lscpu
....
CPU(s):                2 #  确认有几个核
On-line CPU(s) list:   0-1
Thread(s) per core:    1
NUMA node0 CPU(s):     0-1
2、查看当没有指定cpu的时候,每个worker进程都跑在哪些cpu上
[root@lb ~]# cat /etc/nginx/nginx.conf |grep -i work
worker_processes 2;
[root@lb ~]#  ps -eo pid,args,psr | grep [n]ginx
   6989 nginx: master process /usr/   1
   6990 nginx: worker process         0 # 第一颗
   6991 nginx: worker process         1 # 第二颗
补充说明:命令ps -eo pid,args,psr 是用来显示进程ID(pid)、命令行参数(args)以及进程运行的处理器ID(psr)。
3、配置亲和
[root@lb ~]# vi /etc/nginx/nginx.conf
worker_processes auto;
worker_cpu_affinity 10 10;  #  为了很好的看到效果,所有worker都分配到一个cpu上
[root@lb ~]# systemctl restart nginx
4、再次查看
[root@lb ~]# ps -eo pid,args,psr | grep [n]ginx
   7007 nginx: master process /usr/   1
   7008 nginx: worker process         1  # 所有worker都跑到了第1颗cpu上
   7009 nginx: worker process         1  # 所有worker都跑到了第1颗cpu上
四、nginx通用优化文件
1.通用优化配置
[root@nginx ~]# cat nginx.conf
user www;                                   #nginx启动用户
worker_processes auto;                       #nginx工作进程数
worker_cpu_affinity auto;                     #开启CPU亲和
error_log /var/log/nginx/error.log warn;      #错误日志,存放路径,记录日志的级别
pid /run/nginx.pid;                         #指定pid文件位置
worker_rlimit_nofile 35535;                  #指定nginx服务的最大打开文件数

events {
    use epoll;                              #使用epoll网络模型
    worker_connections 10240;                #worker工作进程的最大连接数
}

http {
    include             mime.types;                #nginx能识别的文件类型
    default_type        application/octet-stream;   #nginx不识别的文件类型默认下载
    charset utf-8;                               #指定字符集

    log_format  main  '$remote_addr - $remote_user [$time_local] "$request" '
                      '$status $body_bytes_sent "$http_referer" '
                      '"$http_user_agent" "$http_x_forwarded_for"';           #配置日志格式

    access_log  /var/log/nginx/access.log  main     #指定访问日志路径,调用日志的格式
    server_tokens off;                            #隐藏版本号
    client_max_body_size 200m;                     #上传文件大小限制
    sendfile            on;                        #高效读取
    tcp_nopush          on;                         #高效传输
    #tcp_nodelay         on;                        #实时传输
    keepalive_timeout   65;                         #开启长连接
    gzip on;                                      #开启压缩
    gzip_disable "MSIE [1-6]\.";                  #指定不压缩的浏览器
    gzip_http_version 1.1;                          #压缩后传输的协议
    gzip_comp_level 4;                              #压缩的级别
    gzip_buffers 16 8k;                             #压缩缓存
    gzip_min_length 1024;                           #开启压缩的最小值
    gzip_types text/plain text/css application/json application/x-javascript text/xml application/xml application/xml+rss text/javascript image/jpeg;       #压缩的文件类型
    include /etc/nginx/conf.d/*.conf;               #包含的配置文件
}
2.nginx优化总结
1、CPU亲和、worker进程数、调整nginx进程打开的文件句柄数
2、使用Epool网络模型、调整每个worker进程的最大连接数
3、文件的高效读取sendfile、nopush
4、文件的传输实时性、nodealy
5、开启tcp长连接,以及长连接超时时间keepalive_timeout
6、开启文件传输压缩gzip
7、开启静态文件expires缓存
8、隐藏nginx版本号
9、禁止通过ip地址访问,禁止恶意域名解析,只允许域名访问
10、配置防盗链、以及跨域访问
11、防DDOS、cc攻击,限制单IP并发连接,以及http请求
12、优雅显示nginx错误页面
13、nginx加密传输https优化
14、nginx proxy_cache、fastcgi_cache、uwsgi_cache 代理缓存,第三方工具(squid、varnish)
五、PHP优化
1.配置PHP页面
[root@web01 ~]# vim /etc/nginx/conf.d/php.conf
server {
    listen 80;
    server_name linux.phpserver.com;
    root /code/phpserver;
    index index.php;

    location ~* \.php$ {
        fastcgi_pass 127.0.0.1:9000;
        fastcgi_param SCRIPT_FILENAME $document_root$fastcgi_script_name;
        include fastcgi_params;
    }
}

#配置站点
[root@web01 ~]# mkdir /code/phpserver
[root@web01 ~]# vim /code/phpserver/index.php
<?php
    phpinfo();